How to Change the Air Filter on a Honda Civic Like a Pro
Changing the air filter on your Honda Civic is one of the easiest DIY maintenance tasks you can do. A clean air filter improves engine performance, fuel efficiency, and overall driving experience. With just a few basic tools and about 15 minutes, you can complete this simple Honda Civic maintenance job at home.
Keeping your Honda Civic running smoothly starts with simple maintenance. One of the most overlooked yet important tasks is replacing the air filter. A dirty air filter restricts airflow to the engine. This can reduce performance and waste fuel. The good news is that changing the air filter on a Honda Civic is incredibly easy. You do not need any special skills or expensive tools. In this guide, I will walk you through every step of the process. By the end, you will feel confident doing this job yourself.
Your Honda Civic relies on clean air to burn fuel efficiently. The engine air filter catches dust, dirt, and debris before they enter the combustion chamber. Over time, this filter gets clogged. A clogged filter means your engine works harder than it needs to. This leads to reduced fuel economy and sluggish acceleration. Many car owners ignore this simple replacement until problems appear. Do not wait for symptoms to show up. Regular air filter replacement keeps your engine healthy and your driving experience enjoyable.
The cost of a new air filter is very low. Most Honda Civic air filters cost between 15 and 30 dollars. Compare that to paying a mechanic 50 to 100 dollars for the same job. Doing it yourself saves both money and time. Plus, you learn more about your vehicle. This knowledge builds confidence for other DIY maintenance tasks. Let us dive into the step-by-step process of changing your Honda Civic air filter like a pro.
Key Takeaways
- Easy DIY Job: Changing your Honda Civic air filter takes only 15 minutes and requires no special tools.
- Saves Money: Doing it yourself avoids costly mechanic fees and keeps your car running at peak performance.
- Boosts Engine Health: A clean air filter improves airflow, fuel efficiency, and engine longevity.
- Simple Location: The air filter housing is easy to access under the hood of most Honda Civic models.
- Regular Maintenance: Replacing your air filter every 12,000 to 15,000 miles keeps your car in top shape.
📑 Table of Contents
- Why Changing Your Honda Civic Air Filter Matters
- When to Replace Your Honda Civic Air Filter
- Tools and Materials You Will Need
- Step-by-Step Guide to Changing Your Honda Civic Air Filter
- Common Mistakes to Avoid When Changing Your Air Filter
- Air Filter Types: OEM vs Aftermarket for Honda Civic
- How to Know If Your Honda Civic Needs More Than an Air Filter Change
- Expert Tips for Keeping Your Honda Civic’s Engine Healthy
- Conclusion
Why Changing Your Honda Civic Air Filter Matters
The air filter might seem like a small and unimportant part. It plays a huge role in how your engine performs. Think of it like breathing through a dirty mask. Your body struggles to get enough air. The same thing happens to your engine with a clogged filter.
Improved Engine Performance
Clean air allows your engine to burn fuel more efficiently. When airflow is unrestricted, the engine produces more power. You will notice smoother acceleration and better throttle response. A dirty filter starves the engine of oxygen. This creates an imbalanced air-fuel mixture. The result is rough idling, hesitation, and reduced power.
Better Fuel Economy
A clogged air filter forces the engine to work harder. It burns more fuel to compensate for the lack of air. Replacing a dirty filter can improve your gas mileage by up to 10 percent. Over time, these savings add up at the pump. For a Honda Civic owner, this means more miles per gallon and less money spent on fuel.
Longer Engine Life
Dust and debris that slip past a dirty filter can damage internal engine parts. Over time, this causes premature wear on cylinders and pistons. A clean air filter acts as the first line of defense. It protects sensitive engine components from harmful particles. Regular replacement is one of the cheapest ways to extend your engine’s lifespan.
Reduced Emissions
A properly functioning air filter helps your engine burn fuel completely. Incomplete combustion creates harmful emissions. A clean filter ensures the right air-fuel ratio. This means your Honda Civic produces fewer pollutants. It also helps your car pass emissions inspections with ease.
When to Replace Your Honda Civic Air Filter
Knowing when to change your air filter is just as important as knowing how. Most manufacturers recommend replacing the filter every 12,000 to 15,000 miles. However, driving conditions can change this timeline significantly.
Driving Conditions That Require More Frequent Changes
- Dusty or unpaved roads: These environments clog filters faster.
- Heavy traffic in urban areas: Stop-and-go driving exposes the filter to more pollutants.
- High pollen or pollution areas: More airborne particles mean a dirtier filter sooner.
- Frequent short trips: The engine does not reach optimal temperature, causing more debris buildup.
Signs Your Air Filter Needs Replacement
Watch for these warning signs that indicate a dirty air filter:
- Reduced acceleration: Your Honda Civic feels sluggish when you press the gas pedal.
- Dark exhaust smoke: Black or grey smoke can indicate an imbalanced air-fuel mixture.
- Unusual engine sounds: A wheezing or coughing noise may signal restricted airflow.
- Check engine light: In some cases, a severely clogged filter triggers this warning light.
- Lower fuel economy: If you are visiting the gas station more often, check your air filter first.
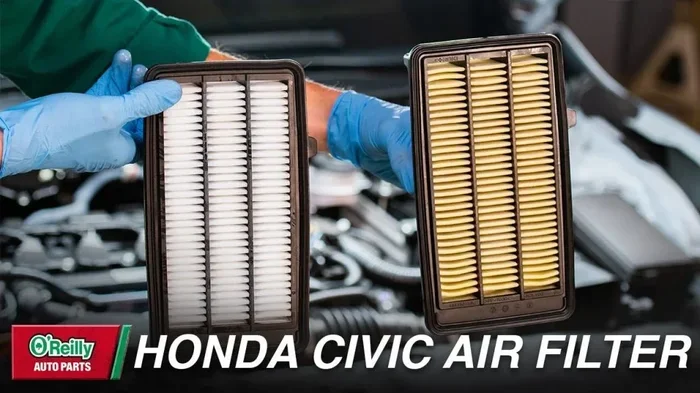
If you notice any of these symptoms, inspect your air filter right away. You can do a visual check by removing the filter from its housing. A clean filter looks white or light grey. A dirty filter appears dark brown or black. If it looks discolored and clogged, it is time for a replacement.
Tools and Materials You Will Need
One of the best things about this job is how simple the tool requirements are. You do not need a mechanic’s full toolbox. Here is everything you need to change the air filter on a Honda Civic like a pro.
Required Tools
- New Honda Civic air filter: Check your owner’s manual for the correct part number. You can also find this at any auto parts store.
- Phillips head screwdriver: Most Honda Civic air filter housings use Phillips screws.
- Flathead screwdriver (optional): Helpful for prying open clips or removing stubborn parts.
- Clean cloth or rag: Use this to wipe down the air filter housing before installing the new filter.
- Flashlight: Helps you see inside the housing and check for debris.
Optional but Helpful Items
- Compressed air canister: Useful for cleaning out loose debris from the housing.
- Gloves: Keeps your hands clean during the process.
- Owner’s manual: Always good to have for reference on your specific model year.
Before you start, make sure you purchase the correct air filter for your Honda Civic model year. Different years and trim levels may use slightly different filters. You can find the right filter online or at your local auto parts store. If you are unsure, ask the store staff for help. They can usually look up the correct part by your vehicle’s year, make, and model.
Step-by-Step Guide to Changing Your Honda Civic Air Filter
Now let us get into the actual process. Follow these steps carefully, and you will have a new air filter installed in no time.
Step 1: Park Your Honda Civic and Let It Cool Down
Park your car on a flat surface and turn off the engine. Wait at least 10 to 15 minutes for the engine to cool down. The engine and surrounding components can get very hot while running. Working on a warm engine increases the risk of burns. Once the car has cooled, open the hood and secure it with the prop rod.
Step 2: Locate the Air Filter Housing
The air filter housing on a Honda Civic is located under the hood, usually on the top or side of the engine. Look for a large rectangular or circular plastic box connected to the engine with a large rubber hose. This is the air intake box. The lid is typically held down by a metal clip or several Phillips screws.
If you have trouble finding it, refer to your owner’s manual. It includes a diagram showing the exact location for your specific model year. The housing is easy to spot because it is the largest non-engine component near the top of the engine bay.
Step 3: Remove the Air Filter Housing Lid
If your housing uses a metal clip, press it to release and lift the lid off. If it uses screws, use your Phillips head screwdriver to remove them. Keep the screws in a safe place so they do not get lost. Once the lid is off, you will see the air filter sitting inside the housing.
Step 4: Remove the Old Air Filter
Carefully lift the old air filter out of the housing. Note how it sits inside so you can orient the new filter the same way. Inspect the old filter closely. Hold it up to a light source. If very little light passes through, the filter is definitely due for replacement.
Take this moment to inspect the inside of the housing. Use your clean cloth to wipe away any dust or debris. Use your flashlight to look for any foreign objects that may have entered the housing. A little bit of debris is normal, but large particles could indicate a problem with the filter or intake system.
Step 5: Install the New Air Filter
Place the new air filter into the housing. Make sure it sits flat and fits snugly against all sides. The filter should match the orientation of the old one. There is usually an arrow on the filter frame indicating the direction of airflow. Make sure this arrow points toward the engine.
Do not force the filter into place. It should fit easily without needing to be pressed or bent. If it does not fit, double-check that you have the correct filter for your Honda Civic model.
Step 6: Reattach the Housing Lid
Place the lid back onto the housing and secure it with the metal clip or screws. Make sure it clicks into place or that all screws are tightened firmly. A loose lid allows unfiltered air to enter the engine, which defeats the purpose of having an air filter.
Step 7: Start Your Engine and Test
Close the hood and start your Honda Civic. Listen for any unusual sounds that might indicate a problem. Take the car for a short test drive. You should notice a slight improvement in throttle response and engine smoothness. If everything sounds normal, you have successfully completed the job.
Common Mistakes to Avoid When Changing Your Air Filter
Even simple tasks can go wrong if you are not careful. Here are some common mistakes to watch out for.
Forgetting to Check the Air Filter Housing
Many people focus only on replacing the filter and skip cleaning the housing. Dust and debris left inside the housing can contaminate the new filter almost immediately. Always wipe down the housing before installing the new filter.
Installing the Filter Backwards
The airflow direction matters. Installing the filter backwards restricts airflow instead of improving it. Always check the arrow on the filter frame and make sure it points toward the engine.
Using the Wrong Filter
Not all air filters are the same size or shape. Using the wrong filter can lead to poor sealing, unfiltered air entering the engine, and potential damage. Always verify the part number matches your Honda Civic’s year and trim level.
Over-Tightening the Housing Lid
The housing lid does not need to be extremely tight. Over-tightening the screws can crack the plastic housing or strip the threads. Hand-tight is usually sufficient.
Ignoring Other Maintenance While You Are There
While the air filter housing is open, take a moment to check other components nearby. Look at the serpentine belt for cracks or wear. Check the coolant level in the nearby reservoir. These small checks take almost no extra time and can prevent bigger problems down the road.
Air Filter Types: OEM vs Aftermarket for Honda Civic
When shopping for a replacement air filter, you will encounter two main options. Understanding the differences helps you make the best choice for your Honda Civic.
OEM (Original Equipment Manufacturer) Filters
OEM filters are made by the same company that supplies Honda. They meet the exact specifications for your vehicle. OEM filters provide reliable filtration and fit perfectly. They are the safest choice for most drivers. Most new Honda Civics come with OEM filters from the factory.
Aftermarket Filters
Aftermarket filters are made by third-party companies. Some aftermarket filters offer higher airflow or longer replacement intervals. Performance-oriented aftermarket filters, like K&N or AEM, are designed to increase engine power. However, they may not filter as finely as OEM filters. For most daily drivers, OEM filters remain the best choice.
If you want to explore aftermarket options, consider your driving habits. If you drive in dusty conditions, an OEM filter with a slightly higher filtration rating might be better. If you want a slight performance boost, a high-flow aftermarket filter could be worth considering.
For more information about air filter maintenance and replacement costs, check out Does Jiffy Lube Change Engine Air Filters. This article covers what professional services include and how they compare to DIY replacement.
How to Know If Your Honda Civic Needs More Than an Air Filter Change
Sometimes symptoms that seem like a dirty air filter point to a bigger issue. It is important to know when simple maintenance is not enough.
When to See a Professional
If you replace your air filter and still experience poor performance, there may be a deeper problem. The engine diagnostic system in your Honda Civic can reveal hidden issues. A full car diagnostic check reads error codes from your vehicle’s computer. This helps identify problems that a visual inspection cannot catch.
For example, if your check engine light stays on after replacing the air filter, you should have a full car diagnostic performed. This quick check can reveal sensor failures, fuel system issues, or other problems that mimic dirty air filter symptoms.
Other signs that go beyond a simple air filter issue include:
- Persistent rough idling: Even after a new filter, if the engine idles roughly, there may be a deeper issue.
- Significant power loss: A small drop in performance is normal with a dirty filter. A major loss suggests something else.
- Fuel smells or leaks: These are unrelated to air filters and need immediate attention.
- Overheating: This is never related to the air filter and requires urgent diagnosis.
Regular Honda Civic maintenance includes more than just air filter changes. Staying on top of oil changes, spark plug replacements, and brake inspections keeps your car running reliably for years.
Expert Tips for Keeping Your Honda Civic’s Engine Healthy
Beyond air filter replacement, a few simple habits go a long way in preserving your Honda Civic’s engine.
Check Your Air Filter Monthly
Get into the habit of visually inspecting your air filter once a month. You do not need to remove it every time. Just pop the hood and look at the housing. If it looks excessively dirty, go ahead and replace it. Early detection prevents performance issues from developing.
Keep Your Engine Bay Clean
Dirt and grease buildup in the engine bay can find their way into the air intake system. Periodically wipe down the area around the air filter housing. This simple step reduces the amount of contamination your new filter has to handle.
Follow the Maintenance Schedule
Your Honda Civic owner’s manual includes a detailed maintenance schedule. Follow it closely. Each service interval addresses a specific aspect of your vehicle’s health. Sticking to the schedule prevents small issues from becoming expensive repairs.
Drive Responsibly
Aggressive driving puts extra stress on your engine and all its components. Smooth acceleration and gentle braking extend the life of your engine. They also help your air filter last longer by reducing the amount of dust and debris drawn into the intake system.
Want to learn more about keeping your Honda Civic in top shape? Read up on how to clean the inside of your car windscreen and other simple maintenance tasks that make a big difference in your daily driving experience.
Conclusion
Changing the air filter on your Honda Civic is one of the simplest and most rewarding DIY maintenance tasks you can do. It takes just 15 minutes, costs very little, and delivers immediate benefits. A clean air filter improves engine performance, boosts fuel economy, and protects your engine from harmful debris. With the steps outlined in this guide, you can confidently tackle this job at home without visiting a mechanic.
Remember to check your air filter regularly and replace it according to your driving conditions. Keep the right tools and a spare filter on hand so you are always prepared. Your Honda Civic will reward you with smooth, reliable performance for years to come. Take pride in maintaining your vehicle yourself. Each small job you complete builds your confidence and deepens your connection with your car. Start today, and enjoy the satisfaction of keeping your Honda Civic running like a pro.
Frequently Asked Questions
How often should I change the air filter on my Honda Civic?
Most Honda Civic models require an air filter change every 12,000 to 15,000 miles. However, if you frequently drive in dusty or polluted areas, you may need to replace it more often. A visual inspection every month helps you catch a dirty filter early.
Can I reuse my old Honda Civic air filter?
No, disposable paper air filters should not be reused. Once the filter material becomes clogged with dirt and debris, it cannot be cleaned effectively. Always install a new filter to ensure proper airflow and engine protection.
What happens if I drive with a dirty air filter?
Driving with a dirty air filter reduces engine performance and fuel efficiency. It can also cause rough idling, hesitation during acceleration, and increased emissions. Over time, a severely clogged filter can lead to engine damage from unfiltered particles entering the combustion chamber.
Do I need any special tools to change the Honda Civic air filter?
No special tools are needed. A Phillips head screwdriver is usually all you require. Most Honda Civic air filter housings use simple clips or screws. A clean cloth and flashlight are helpful but not essential.
Can a dirty air filter cause the check engine light to come on?
Yes, in some cases a severely clogged air filter can trigger the check engine light. The restricted airflow creates an imbalanced air-fuel mixture that the engine computer detects. However, other issues can also cause this light, so always have the codes read if the light stays on after replacing the filter.
Is it better to use an OEM or aftermarket air filter for my Honda Civic?
OEM filters are the safest and most reliable choice for most drivers. They match Honda’s exact specifications and provide excellent filtration. Aftermarket performance filters can offer increased airflow but may not filter as finely. Choose OEM unless you have specific performance goals and understand the trade-offs.