How to Check the Coolant Level on Your Honda Civic
Checking the coolant level on your Honda Civic is one of the easiest ways to protect your engine from overheating and serious damage. This guide walks you through every step safely and clearly, from locating the coolant reservoir to knowing when to add more. You will learn what tools you need, how to read the markings correctly, and the warning signs that mean your cooling system needs attention. Whether you are a beginner or a seasoned DIYer, these tips will help you keep your Honda Civic running strong.
Your Honda Civic is built to run smoothly, but it relies on a simple fluid to stay that way. Coolant, sometimes called antifreeze, keeps your engine from overheating in the summer and freezing in the winter. Without enough coolant, your engine can face serious damage that costs thousands to fix. The good news is that checking your coolant level takes just a few minutes and requires almost no tools.
In this guide, we will show you exactly how to check the coolant level on your Honda Civic, step by step. We will cover what you need before you start, how to read the reservoir markings, when to add more coolant, and the warning signs that something is wrong. By the end, you will feel confident doing this simple maintenance task on your own.
Before we dive in, a quick note about safety. Coolant can be hot and pressurized when the engine is running. Always wait for the engine to cool down completely before you open anything under the hood. Taking a few extra minutes to be safe will protect both you and your car.
Key Takeaways
- Safety first: Always check coolant when the engine is cool to avoid burns and injury.
- Locate the reservoir: The coolant expansion tank on your Honda Civic is easy to find under the hood.
- Read the markings: The MIN and MAX lines on the reservoir tell you exactly where your coolant level should be.
- Use the right coolant: Honda recommends specific coolant types to protect your engine and cooling system.
- Watch for warning signs: Overheating, a rising temperature gauge, or a sweet smell under the hood all point to low coolant.
- Regular checks save money: A quick coolant check every few weeks can prevent expensive repairs down the road.
📑 Table of Contents
- Why Checking Your Honda Civic Coolant Level Matters
- What You Will Need Before You Start
- Step-by-Step Guide to Checking the Coolant Level
- Understanding Your Honda Civic Cooling System
- When to Add or Replace Coolant
- Common Honda Civic Coolant Problems and How to Fix Them
- Expert Tips for Keeping Your Honda Civic Cooling System Healthy
- Conclusion
Why Checking Your Honda Civic Coolant Level Matters
Coolant is the lifeblood of your Honda Civic’s engine cooling system. It flows through the engine block, absorbs heat, and carries that heat to the radiator where it cools down. When the level drops too low, the system cannot do its job properly. The result can be an overheating engine, warped metal parts, or even a cracked engine block.
Many Honda Civic owners forget about coolant until something goes wrong. A rising temperature gauge on the dashboard is often the first sign that something is wrong. Checking your coolant level regularly can catch a low level before it turns into a big problem. Most experts recommend checking your coolant at least once a month, or before any long road trip.
Here are a few reasons why keeping an eye on your coolant level is so important:
- Prevents engine overheating: Low coolant means less heat absorption, which can cause your engine to overheat quickly.
- Saves you money: A small top-off costs almost nothing, but replacing a damaged engine can cost hundreds or thousands of dollars.
- Extends engine life: Keeping your cooling system full and working properly helps your engine last longer.
- Catches leaks early: A dropping coolant level can signal a leak somewhere in the system that needs attention.
Also, if you ever notice your temperature gauge climbing while driving, pull over safely and turn off the engine. Continuing to drive an overheating car can cause permanent damage. If you are unsure whether it is safe to drive, check out our article on whether you can drive with a check engine light on for general guidance on warning lights.
What You Will Need Before You Start
One of the best things about checking your Honda Civic coolant level is how simple it is. You do not need any fancy tools or mechanical skills. Here is a short list of what you should have ready before you open the hood.
Basic Tools and Supplies
- A clean cloth or paper towel: You will use this to wipe up any small spills or residue around the reservoir.
- The correct coolant for your Honda Civic: Honda typically recommends Honda Genuine coolant or a compatible ethylene glycol-based coolant. Check your owner’s manual for the exact type.
- A clean container (optional): If you need to add coolant, having a small funnel and a clean container makes the process neater.
- Gloves: Coolant can irritate your skin, so a pair of rubber gloves is a good idea.
Safety Gear and Precautions
Safety is the most important part of any car maintenance task. Coolant is toxic to animals and can irritate your skin, so handle it carefully. Always work in a well-ventilated area. Never open the radiator cap when the engine is hot. The system is pressurized, and opening it while hot can cause hot coolant to spray out and cause serious burns.
If you are not sure whether your engine has cooled down enough, wait at least 30 minutes after turning off the car. The hood should feel cool to the touch before you start working. Taking this extra step keeps you safe and makes the job much easier.
Step-by-Step Guide to Checking the Coolant Level
Now that you have everything ready, let us walk through the actual process. This is the same process that works for most Honda Civic models from recent years, but you should always refer to your specific owner’s manual if you are unsure.
Step 1: Park on a Level Surface and Turn Off the Engine
Find a flat, level surface to park your Honda Civic. This ensures the coolant reading is accurate, since the reservoir markings are designed for a level position. Turn off the engine and let it sit until it is completely cool. Do not rush this step.
Step 2: Locate the Coolant Reservoir
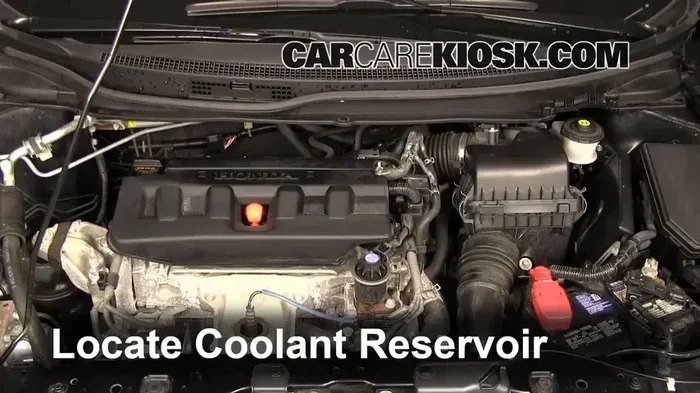
Open the hood and prop it securely with the hood stand. The coolant expansion tank is usually located on the left side of the engine bay (when facing the front of the car). It is a translucent plastic tank with MIN and MAX markings on the side. If you are having trouble finding it, look for a cap labeled with a coolant symbol or the word COOLANT. Your Honda Civic owner’s manual can also show you the exact location.
Step 3: Inspect the Reservoir and Read the Level
Look at the side of the coolant reservoir. You will see two lines marked MIN and MAX. The coolant level should be between these two lines when the engine is cold. If the level is at or below the MIN line, you need to add more coolant. If it is at or near the MAX line, you are good to go.
Take a moment to also look at the color and condition of the coolant. Fresh coolant is usually bright green, blue, or pink depending on the type. If the coolant looks rusty, muddy, or has particles floating in it, it may be time for a full flush and replacement.
Step 4: Add Coolant if Needed
If your coolant level is low, you can add more directly to the reservoir. Do not open the radiator cap itself — the reservoir is designed for easy filling. Remove the cap on the reservoir slowly and carefully. Use a funnel to pour in the coolant until it reaches the MAX line. Do not overfill, as the system needs room for expansion.
Replace the cap securely when you are done. Wipe up any spills with your cloth. Start the engine and let it run for a few minutes. Check the reservoir again with the engine running to make sure the level stays steady. A slight drop after running is normal, but a large drop could indicate a leak.
If you find that your coolant level drops frequently, that is a sign of a leak somewhere in the system. This is not something you should ignore. In some cases, a check engine light may also come on when coolant is low. If you are dealing with a check engine light, you might want to read about whether a check engine light can turn off on its own to understand what might be happening with your vehicle.
Understanding Your Honda Civic Cooling System
To truly understand why checking coolant matters, it helps to know a little bit about how the cooling system works. The system is actually quite simple, and knowing how it all fits together makes the maintenance task feel much less intimidating.
How the Cooling System Works
When your Honda Civic engine runs, it generates a lot of heat. The coolant circulates through passages in the engine block, absorbing that heat. The heated coolant then flows to the radiator, where air passing through the radiator fins cools it down. The cooled coolant cycles back into the engine, and the process repeats continuously. The expansion tank, or reservoir, gives the coolant a place to expand when it heats up and contract when it cools down.
The Role of the Thermostat
Your Honda Civic also has a thermostat that regulates the flow of coolant. When the engine is cold, the thermostat stays closed to help the engine warm up quickly. Once the engine reaches the right operating temperature, the thermostat opens and allows coolant to flow through the system. A faulty thermostat can cause overheating or poor heating, so it is worth keeping an eye on.
If you ever suspect a problem with your cooling system that goes beyond a simple level check, a full car diagnostic can help identify the issue. You can learn more about how long a full car diagnostic takes in our detailed guide here.
When to Add or Replace Coolant
Topping off your coolant is a quick fix, but there comes a time when a full coolant flush and replacement is necessary. Knowing when to do this can save you from bigger problems down the road.
Signs You Need a Coolant Flush
You should consider a full coolant replacement if you notice any of the following:
- The coolant color has changed to a rusty brown or dark muddy color.
- You see particles or sediment floating in the coolant.
- The coolant level drops frequently even after topping it off.
- Your Honda Civic’s heater is not blowing hot air.
- You notice a sweet, syrupy smell coming from under the hood.
How Often Should You Replace Coolant?
Most Honda Civics need a coolant flush every 3 to 5 years, or every 30,000 to 60,000 miles. However, this can vary depending on the model year and the type of coolant you use. Always check your owner’s manual for the manufacturer’s recommended schedule. Using the wrong type of coolant can also cause problems, so make sure you are using the right one for your Honda Civic.
If you are unsure about your coolant condition or want a professional opinion, a mechanic can run a quick test to check the coolant’s pH level and freeze point. This simple test takes just a few minutes and can tell you a lot about the health of your cooling system.
Common Honda Civic Coolant Problems and How to Fix Them
Even with regular maintenance, Honda Civic owners can run into coolant-related issues. Here are some of the most common problems and what you can do about them.
Coolant Leak from the Reservoir
A small crack or loose cap on the coolant reservoir can cause a slow leak. If you notice a puddle of colorful fluid under your car, check the reservoir and its cap first. A new cap is inexpensive and easy to replace. If the reservoir itself is cracked, it will need to be replaced.
Overheating Despite Full Coolant Level
If your coolant level is fine but the engine still overheats, the problem might be a faulty thermostat, a clogged radiator, or a failing water pump. These are more serious issues that usually require a mechanic’s help. If you see steam coming from under the hood or the temperature gauge is in the red, pull over immediately and turn off the engine.
Mixed Coolant Types
Different coolant types should not be mixed together. Combining incompatible coolants can cause a gel-like substance to form, which can clog the cooling system. If you are unsure what type of coolant is already in your system, it is best to flush the entire system and refill it with the correct type.
If you are ever unsure about a warning light on your dashboard, you can also read our article on whether you can run diagnostics without a check engine light for helpful guidance.
Expert Tips for Keeping Your Honda Civic Cooling System Healthy
Taking care of your Honda Civic’s cooling system does not have to be complicated. A few simple habits can keep everything running smoothly for years to come. Here are some expert tips that real mechanics and experienced car owners swear by.
- Check coolant levels monthly: Make it part of your regular car care routine. A quick glance at the reservoir takes less than a minute.
- Always use Honda-recommended coolant: Aftermarket coolants can work, but sticking with what Honda recommends ensures the best compatibility with your engine and hoses.
- Inspect hoses and connections: While you are under the hood, take a look at the hoses connected to the radiator and reservoir. Cracks, swelling, or soft spots are signs that a replacement is needed.
- Do not ignore small leaks: Even a tiny drip can lead to a big problem over time. Address any leaks as soon as you notice them.
- Keep your radiator clean: Dirt and debris can block airflow to the radiator, reducing its cooling efficiency. A gentle rinse with a hose can help keep it clean.
- Track your coolant changes: Keep a record of when you last flushed and replaced your coolant. This makes it easy to stay on schedule.
Remember, your Honda Civic’s cooling system works hard every time you turn the key. A little attention goes a long way toward preventing breakdowns and expensive repairs. A few minutes spent checking your coolant today can save you hours of trouble — and a lot of money — in the future.
Taking care of your car also means staying informed about other aspects of maintenance. For example, did you know that leaving a car door open can drain the battery? Check out our article on whether leaving a car door open drains the battery to learn more about simple car care habits that protect your Honda Civic.
Conclusion
Checking the coolant level on your Honda Civic is one of the simplest and most important things you can do as a car owner. It takes just a few minutes, requires minimal tools, and can prevent serious engine damage. By following the steps in this guide, you now know exactly how to locate the reservoir, read the level markings, add coolant when needed, and spot the warning signs of a bigger problem.
Make it a habit to check your coolant regularly. Combine it with other routine checks like tire pressure and oil level, and you will be well on your way to keeping your Honda Civic in excellent shape. Your engine will thank you, and your wallet will too.
Stay proactive with your car maintenance, and you will enjoy many more miles of reliable driving. Your Honda Civic is a smart, efficient machine — and with a little care, it will keep running strong for years to come.
Frequently Asked Questions
Can I check the coolant level with the engine running?
No, you should always check the coolant level with the engine turned off and completely cool. The cooling system is pressurized when hot, and opening it can cause hot coolant to spray out, which can cause burns. Wait at least 30 minutes after driving before you check the coolant.
What happens if I drive my Honda Civic with low coolant?
Driving with low coolant can cause your engine to overheat, which may lead to warped cylinder heads, blown head gaskets, or a cracked engine block. These repairs are very expensive. If your coolant is low, top it off as soon as possible and investigate why it dropped in the first place.
Can I use water instead of coolant in my Honda Civic?
Water can work in an emergency, but it is not a long-term substitute for coolant. Water does not have the same heat protection properties and can cause corrosion in the cooling system. Always use the proper Honda-recommended coolant for the best protection.
How do I know which coolant type my Honda Civic needs?
The best way is to check your Honda Civic owner’s manual, which will specify the exact coolant type and color recommended for your model year. You can also look at the coolant currently in the reservoir for color and consistency, and match it to the manufacturer’s specifications.
Why is my Honda Civic losing coolant but there is no visible leak?
An invisible coolant loss can be caused by a small internal leak, a faulty radiator cap, or even a blown head gasket. If you notice a consistent drop in coolant level without any visible external leaks, it is best to have a mechanic run a pressure test to find the source.
Is it normal for the coolant level to drop slightly over time?
A very slight drop over several months can be normal due to natural expansion and contraction of the coolant. However, if you find yourself needing to add coolant frequently, that is a sign of a leak or another issue that should be addressed promptly.
=== CONCLUSION ===
Checking the coolant level on your Honda Civic is a quick, easy, and essential part of car ownership. With just a few simple steps, you can protect your engine from overheating, catch potential problems early, and avoid costly repairs. Make this a regular part of your car care routine, and your Honda Civic will reward you with reliable performance for many miles to come. Start today — your engine will thank you.