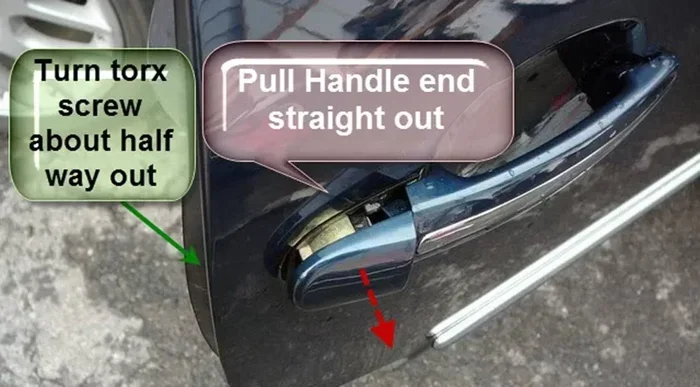
How Do You Remove a Plastic Door Handle Without Damage
Removing a plastic door handle doesn’t have to be scary or expensive. This guide walks you through every step to safely take off a plastic door handle without scratching, cracking, or breaking the surrounding trim. Whether it’s a car door handle or an interior handle, you’ll find clear instructions and pro tips that make the job easy.
Have you ever needed to remove a plastic door handle and felt totally lost? Maybe the handle is broken, or you want to paint it a new color. Whatever the reason, the process is simpler than you think. You don’t need to be a mechanic to get it done right. With the right approach, you can pull off a plastic door handle removal without a single scratch. This guide covers everything you need to know, from the tools you’ll need to the exact steps to follow. Let’s get started.
A plastic door handle is one of those parts we take for granted every single day. You grab it, pull it, and the door opens. It’s only when it breaks or looks worn that you pay attention. The good news is that most plastic door handles are designed to be removable. Whether you’re working on a car door handle or an interior door handle at home, the basics stay the same. You just need patience and the right method. In this article, we’ll break down every step in plain, simple language. By the end, you’ll feel confident tackling this job on your own.
Key Takeaways
- Right Tools Matter: Using the correct clip removal tool and screwdriver prevents damage to your plastic door handle and surrounding trim.
- Prepare First: Disconnecting the battery and gathering all supplies before you start saves time and frustration.
- Go Slow: Rushing is the number one cause of broken clips and scratched surfaces during door handle removal.
- Know Your Handle Type: Different plastic door handles use different fastening methods, so identify yours first.
- Replace or Repair: Once removed, you can clean, repair, or swap out the handle with confidence.
- Reassembly Is Key: Properly reattaching everything ensures your door handle works smoothly and looks factory-fresh.
📑 Table of Contents
- Why Remove a Plastic Door Handle?
- Tools You’ll Need for Plastic Door Handle Removal
- Step-by-Step Guide to Remove a Plastic Door Handle
- Common Mistakes to Avoid During Door Handle Removal
- How to Reinstall or Replace Your Plastic Door Handle
- Tips for Protecting Your Door During Handle Removal
- When to Call a Professional for Door Handle Removal
- Final Thoughts on Removing a Plastic Door Handle
Why Remove a Plastic Door Handle?
There are plenty of reasons you might need to take off a plastic door handle. Understanding your goal helps you plan the job better. Here are the most common reasons people remove their handles:
- Replacement: A cracked or broken handle needs to be swapped out for a new one.
- Painting or Refinishing: You want to change the color or refresh a faded handle.
- Interior Door Handle Repair: The mechanism inside is sticking or not working properly.
- Car Door Handle Fix: The exterior handle on your vehicle has become loose or wobbly.
- Cleaning Access: You need to reach behind the handle to clean stubborn grime or mold.
- Upgrade: You’re switching to a different style or material for a fresh look.
No matter your reason, the removal process is similar. The key is knowing how your specific plastic door handle is attached. Most use a combination of screws, clips, and a small lever or knob that releases the handle from the door. Once you understand this, the rest is easy.
Tools You’ll Need for Plastic Door Handle Removal
Before you touch anything, gather your tools. Having everything ready keeps the job smooth and prevents damage. You don’t need a fancy workshop — just a few basic items.
Essential Tools
- Phillips and flat-head screwdrivers — Most plastic door handles use Phillips head screws.
- Clip removal tool — This little plastic pry tool saves your trim from scratches.
- Needle-nose pliers — Helpful for gripping small clips and pins.
- Socket set — Some car door handles use metric bolts.
- Soft cloth or towel — Protects the handle and door surface during removal.
- Small container or bag — Keeps screws and clips organized so nothing gets lost.
Optional but Helpful
- Electrical contact cleaner — Useful if you’re working near wiring on a car door handle.
- Flashlight — Helps you see clips and screws hidden in tight spots.
- Rubber gloves — Gives you a better grip on smooth plastic pieces.
Having the right handle removal tool makes a huge difference. A dedicated clip removal tool costs just a few dollars and prevents the most common mistake — prying with a metal screwdriver and scratching the surrounding plastic trim panel. Trust us, a $5 tool saves hundreds in trim replacement.
Step-by-Step Guide to Remove a Plastic Door Handle
Now for the part you’ve been waiting for — the actual removal process. We’ll walk you through it step by step. This guide covers the most common type of plastic door handle found on both cars and interior doors. Always check your specific model first, but this covers the general method.
Step 1: Prepare the Door
Start by making sure the door is open and stable. If you’re working on a car, put it in park and turn off the ignition. For safety, disconnect the negative battery terminal if you’re near any electrical components. Lay a soft towel on the floor or work surface to protect both the handle and the door panel from scratches.
Step 2: Remove the Screws
Most plastic door handles are held in place by two or three screws. Look closely at the handle base. You’ll usually find screws hidden under small plastic covers. Use a flat-head screwdriver or your fingernail to pop these covers off. Then unscrew the screws and place them in your container. Some handles also have a screw hidden under the small lever or button on the side — don’t miss that one.
Step 3: Release the Retaining Clips
Once the screws are out, the handle is still held by retaining clips. These are small plastic fasteners that snap into place. Gently wiggle the handle from side to side while pulling it toward you. You should feel the clips release one by one. If they’re stubborn, use your clip removal tool to carefully pry between the handle and the door. Never use excessive force — plastic clips break easily.
Step 4: Disconnect Any Wiring (Car Handles Only)
If you’re removing a car door handle, there may be a small wiring connector behind it. This connects to the interior light or the power window switch. Press the clip on the connector and gently pull it apart. Use your handle removal tool to carefully release any wiring clips that run along the door panel edge.
Step 5: Pull the Handle Free
With all screws removed, clips released, and wiring disconnected, the handle should pull away from the door easily. Set it aside on your towel. Take a moment to inspect the door handle mechanism and the surrounding area. Look for any damaged clips or worn parts that might need replacing.
That’s it! You’ve successfully removed your plastic door handle without a single scratch. Now let’s talk about what to do next.
Common Mistakes to Avoid During Door Handle Removal
Even simple jobs go wrong when you skip steps or use the wrong technique. Here are the most common mistakes people make when removing a plastic door handle — and how to avoid them.
Using Metal Tools on Plastic
The biggest sin is grabbing a metal screwdriver and prying away. Metal scratches plastic instantly, and those scratches show up like a sore thumb. Always use a plastic trim removal tool or wrap your screwdriver in a cloth. Your interior trim panel will thank you.
Forgetting the Hidden Screw
Many people remove the visible screws and wonder why the handle won’t come off. Check under the lever, the button, and any small caps. There’s almost always a hidden fastening clip or screw waiting to trip you up.
Yanking Too Hard
Plastic clips are designed to snap in and out, not to be ripped apart. If a handle isn’t moving, stop and look for what’s holding it. Applying too much force cracks the handle base or breaks the clip. Patience pays off here.
Skipping the Wiring Disconnect
On cars, pulling a handle without disconnecting the wiring can damage the electrical connector. This leads to a dead interior light or a malfunctioning power window switch. Always check for wires before pulling the handle free.
How to Reinstall or Replace Your Plastic Door Handle
Once the handle is off, you have a few options. You can reinstall the same handle after cleaning or repairing it, or you can swap in a new one. Here’s how to do both right.
Reinstalling the Original Handle
If you removed the handle for cleaning or minor repairs, putting it back is straightforward. Align the handle with the door, making sure any wiring connectors are reattached first. Push the handle firmly into place until all the retaining clips snap in. You should feel and hear each clip engage. Then replace the screws and put the covers back on. Test the handle by opening and closing the door a few times.
Installing a New Handle
If you’re replacing a broken plastic door handle, make sure your new handle matches the original. Check the number of screw holes, the clip positions, and any wiring connector type. Follow the steps above in reverse. Start with the wiring, then align and push the handle on, secure the clips, and finish with the screws.
A door handle replacement doesn’t have to be expensive. Many plastic door handles cost between $10 and $30 for the part alone. With a little DIY effort, you save the cost of a mechanic’s labor fee. Plus, you’ll have the satisfaction of doing it yourself.
Tips for Protecting Your Door During Handle Removal
Protecting the surrounding door components is just as important as removing the handle itself. Here are some quick tips to keep everything looking great.
- Use a soft work surface: A towel or old blanket prevents scratches on both the door and the handle.
- Organize your screws: Use a muffin tin or a small parts tray. Losing a tiny screw means extra time searching.
- Photograph each step: Take a photo before you disconnect anything. It helps a lot when you’re putting things back together.
- Clean the area first: Wipe down the door handle and surrounding trim before removal. Dirt and debris can fall into the door mechanism.
- Work in good lighting: A headlamp or a desk lamp makes it much easier to see hidden clips and screws.
These small habits make a big difference. A clean, organized workspace leads to a smoother removal and a cleaner reinstall. Your plastic door handle will look and work like new when you’re done.
When to Call a Professional for Door Handle Removal
Most plastic door handle removal jobs are DIY-friendly. But there are times when calling a professional makes sense. If the handle is severely rusted, if the door panel is damaged, or if the door latch assembly needs replacement, it’s worth getting expert help. A professional mechanic or trim specialist has the right tools and experience to handle tricky situations without causing further damage.
Also, if you’re working on a newer car with complex electronic features — like power locks, keyless entry, or sensors built into the handle — a professional may be the safer choice. These systems involve wiring that’s easy to damage if you’re not experienced. Know your limits, and don’t hesitate to call in the pros when needed.
Final Thoughts on Removing a Plastic Door Handle
Removing a plastic door handle without damage is a task anyone can do with the right tools and a little patience. The key steps are simple — prepare your workspace, remove the screws, release the clips, and pull the handle free gently. Avoid the common mistakes like using metal tools or yanking too hard, and you’ll keep your door and trim looking perfect.
Whether you’re replacing a broken handle, refreshing the look with a new paint job, or just cleaning behind the handle, this guide gives you everything you need. The process is quick, affordable, and surprisingly satisfying once you see the results. Grab your tools, follow the steps, and you’ll have that plastic door handle off in no time.
Remember, the goal isn’t just to remove the handle — it’s to do it without causing damage. Take your time, work carefully, and enjoy the satisfaction of a job well done. Your door will look great, and you’ll have saved money and learned a valuable skill along the way.
Frequently Asked Questions
Can I remove a plastic door handle without any special tools?
Yes, you can remove most plastic door handles with just a Phillips screwdriver and a flat-head screwdriver. However, a clip removal tool makes the job much easier and prevents scratches. If you don’t have one, you can wrap a flat-head screwdriver in a cloth to protect the trim.
How long does it take to remove a plastic door handle?
For most people, the entire process takes about 10 to 15 minutes. If you’re new to it, give yourself 20 minutes to be safe. The more you do it, the faster you’ll get. Having all your tools ready before you start also cuts down the time significantly.
Will removing a plastic door handle damage my door panel?
Not if you follow the right steps. Using a plastic clip removal tool and going slowly prevents damage to the door panel. The biggest risk comes from using metal tools or pulling too hard. Take your time and the trim will stay in perfect condition.
How do I know if my plastic door handle needs replacing or just cleaning?
If the handle is cracked, broken, or wobbly even after tightening the screws, it needs replacing. If it’s just dirty or faded, a thorough cleaning or a fresh coat of paint might be all it needs. Inspect the handle carefully before deciding on the best approach.
Are all plastic door handles removed the same way?
Most plastic door handles follow the same basic process — remove screws, release clips, and pull free. However, some models have slightly different fastening systems. Always check your vehicle’s manual or look up a specific guide for your make and model before starting. This ensures you don’t miss any hidden screws or clips.
Can I reuse the clips when reinstalling my plastic door handle?
In most cases, yes. The retaining clips are designed to be reused multiple times. However, if any clips are cracked or worn, replace them with new ones. Using damaged clips can cause the handle to become loose over time, which leads to rattling and eventually a broken handle again.
=== CONCLUSION ===
Removing a plastic door handle is a simple, satisfying DIY task that anyone can master. You now know exactly what tools to grab, the steps to follow, and the mistakes to avoid. Whether it’s a car door handle or an interior door handle, the process stays the same — prepare, unscrew, release the clips, and pull gently. Take your time, protect the surrounding trim, and you’ll get clean results every time. With a little practice, you’ll be able to remove and replace a plastic door handle in under 15 minutes. Now go ahead, grab your tools, and give it a try. You’ve got this.