Should a Car Be Level When Changing Oil for Best Results
Yes, a car should be level when changing oil for accurate drainage, proper oil filter removal, and correct oil level readings. An uneven surface can leave old oil trapped, cause overfilling or underfilling, and lead to engine damage over time. Follow these simple tips to make sure your oil change goes smoothly and keeps your engine running strong.
Every car owner eventually faces the task of changing engine oil. It is one of the most important car maintenance jobs you can do yourself. But a question many people ask is whether the car needs to be perfectly level during this process. The short answer is yes. A level surface makes a big difference in how well your oil change goes. In this guide, we will walk you through everything you need to know about leveling your car before an oil change. You will learn why it matters, what can go wrong if you skip this step, and how to do it right every time.
Changing oil might seem simple. You drain the old oil, swap out the filter, and pour in fresh oil. But small details like parking position can affect the outcome more than you think. Whether you are a seasoned DIYer or a first-timer, understanding the role of a level surface will save you time, money, and potential engine trouble. Let us dive into the details.
Key Takeaways
- Level Surface Matters: Parking on a flat surface ensures complete oil drainage and accurate oil level readings after the change.
- Safety First: Always use jack stands on a level surface to prevent the car from rolling or tipping during an oil change.
- Drain Plug Positioning: The drain plug works best when it is at the lowest point, which only happens on a level surface.
- Oil Filter Access: A level car gives you better access to the oil filter, making removal and installation easier and safer.
- Accurate Oil Level: Checking the dipstick on a level surface gives you the true oil level, preventing overfilling or underfilling.
- DIY-Friendly: You can change your own oil at home with basic tools, but always do it on a flat, stable surface.
- Check Oil Life Regularly: Monitor your oil life percentage and change oil at the recommended interval for peak engine health.
📑 Table of Contents
Why a Level Surface Is Important for Oil Changes
When your car sits on a slope or uneven ground, several things go wrong during an oil change. The oil does not drain completely. The dipstick reading becomes inaccurate. And the oil filter can be harder to reach. All of these issues add up to a less effective oil change. Here is a closer look at why a level surface matters so much.
Complete Oil Drainage
Oil drains out of the engine through the drain plug, which is located at the bottom of the oil pan. When the car is level, the drain plug sits at the true lowest point of the oil pan. This means the oil flows out freely and completely. On a slope, oil pools to one side. Some oil gets trapped behind the drain plug or in corners of the oil pan. Over time, this leftover old oil mixes with the fresh oil and reduces its effectiveness.
Think of it like pouring water out of a bowl. If the bowl is flat on the table, every last drop runs out. If the bowl is tilted, water stays stuck on the high side. The same principle applies to your car’s oil pan. A few tablespoons of trapped old oil might not sound like much, but it can affect oil quality and engine protection.
Accurate Oil Level Readings
After you refill with new oil, you need to check the level using the dipstick. The dipstick gives you a reading based on the oil settling evenly in the oil pan. If the car is not level, the oil slants to one side. This means the dipstick reading will be wrong. You might think you have the right amount of oil when you are actually overfilling or underfilling.
Both overfilling and underfilling are bad for your engine. Too much oil can cause pressure buildup and leaks. Too little oil means the engine does not get full lubrication. Either way, you risk serious damage. Checking the oil level on a level surface gives you the most accurate reading every time.
Easier Oil Filter Removal
The oil filter is another key part of the oil change process. On most cars, the filter is located near the bottom of the engine. When the car is level, you have clear access to the filter. You can turn it off smoothly without straining or risking damage. On an uneven surface, the filter might be angled in a way that makes it harder to grip and remove. This is especially true for tight spaces where clearance is already limited.
Plus, when the car is level, the filter drains more completely before you remove it. Less residual oil spills out, keeping your workspace cleaner and reducing waste.
What Happens If You Change Oil on an Uneven Surface
Some people change oil in their driveway on a slight slope or on a garage floor that is not perfectly flat. It happens all the time. But what are the real consequences? Let us break down the risks.
Trapped Old Oil
As mentioned above, oil pools to one side on an uneven surface. This means some old oil stays behind in the engine. Fresh oil gets diluted with contaminants. The oil change becomes less effective. You might need to change your oil more frequently to compensate, which costs more money and time.
Wrong Oil Level
An inaccurate dipstick reading leads to either too much or too little oil. Both situations are harmful. Overfilled oil can foam, which reduces its ability to lubricate engine parts. It can also cause the oil pressure light to come on. Underfilled oil means metal parts grind against each other without proper protection. Over time, this leads to increased wear and potential engine failure.
Safety Hazards
Working on an uneven surface is also a safety risk. The car can roll if it is not properly secured. Jack stands can slip or settle into soft ground. A car jack on a slope is dangerous and should never be used without proper stabilization. Always prioritize safety by choosing a flat, hard surface for any undercarriage work.
How to Level Your Car for an Oil Change
Getting your car level before an oil change is simple. You do not need special equipment or a professional mechanic. Here is a step-by-step guide to make sure your car is properly positioned.
Step 1: Choose the Right Spot
Look for a flat, hard surface. A driveway, garage floor, or level parking lot works great. Avoid grass, gravel, or dirt. These surfaces are soft and can cause the car to shift or sink. Also, avoid spots with a noticeable slope. Even a small tilt can affect oil drainage and dipstick readings.
Step 2: Park Straight
Pull up to the spot and park the car straight. Turn the steering wheel so the front wheels are pointing forward. This keeps the car aligned and reduces the chance of it rolling. Apply the parking brake firmly. You can also place a wheel wedge behind one of the tires for extra safety.
Step 3: Check the Surface
Before you start jacking up the car, do a quick visual check. Look at the ground around the tires. Does the car look level from the side? If you are unsure, place a small bubble level on the hood or trunk lid. This gives you a precise reading and takes the guesswork out of it.
Step 4: Use Jack Stands if Needed
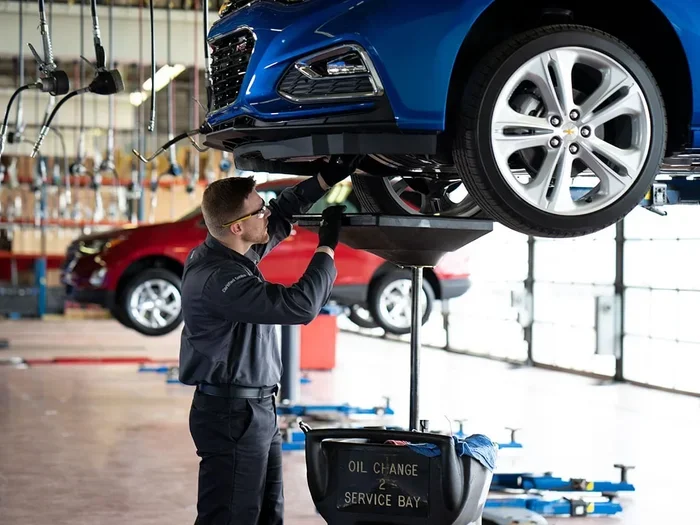
For most oil changes, you do not need to lift the car. You can slide underneath it on a level surface with just a basic floor jack. However, if your car has low ground clearance or the drain plug is hard to reach, you may need to raise it. Always use jack stands to support the car. Never rely on a jack alone. Place the jack stands on solid, flat points along the frame or designated lift points.
Quick Tip: If you are using a hydraulic lift or ramps, make sure they are placed on a level surface as well. Ramps can shift if the ground is uneven, which is a serious safety hazard.
Step-by-Step Oil Change on a Level Surface
Now that your car is properly positioned, here is how to carry out the oil change process the right way.
Gather Your Tools and Materials
Before you start, make sure you have everything you need. Here is a quick checklist:
- New engine oil (check your owner’s manual for the correct type and amount)
- New oil filter
- Oil drain pan
- Socket wrench and the right size socket
- Oil filter wrench (if needed)
- Funnel
- Jack and jack stands (if lifting the car)
- Gloves and safety glasses
- Rags or paper towels
Make sure your engine oil matches the specifications in your vehicle’s manual. Using the wrong oil viscosity can harm your engine. For example, using 5W20 instead of 0W20 in a Corolla can affect engine performance. Always double-check before you pour.
Warm Up the Engine
Start the car and let it run for about 3 to 5 minutes. Warm oil flows more easily and drains better than cold oil. After warming it up, turn off the engine and wait a minute or two for the oil to settle. Then, carefully slide under the car.
Drain the Old Oil
Place your drain pan directly under the drain plug. Use the socket wrench to loosen the plug by turning it counterclockwise. Be careful, as the oil will be warm. Let it drain completely into the pan. Once the flow stops, remove the plug fully and let any remaining oil drip out.
While the oil is draining, this is also a great time to remove the old oil filter. Use an oil filter wrench if the filter is tight. Turn it counterclockwise and let it drain into the pan. Before installing the new filter, lightly coat the rubber gasket with a little fresh oil. This creates a better seal and makes future removal easier.
Replace the Drain Plug and Filter
Once all the old oil has drained, reinstall the drain plug. Use a torque wrench to tighten it to the manufacturer’s specification. Do not overtighten, as this can strip the threads or damage the oil pan. Next, screw on the new oil filter by hand until it is snug, then tighten it slightly with the wrench. Again, do not overtighten.
Add Fresh Oil
Now it is time to add the new oil. Open the oil filler cap on top of the engine. Place a funnel in the opening and pour in the recommended amount. Add a little less than the full amount at first, then check the oil level with the dipstick. This prevents overfilling.
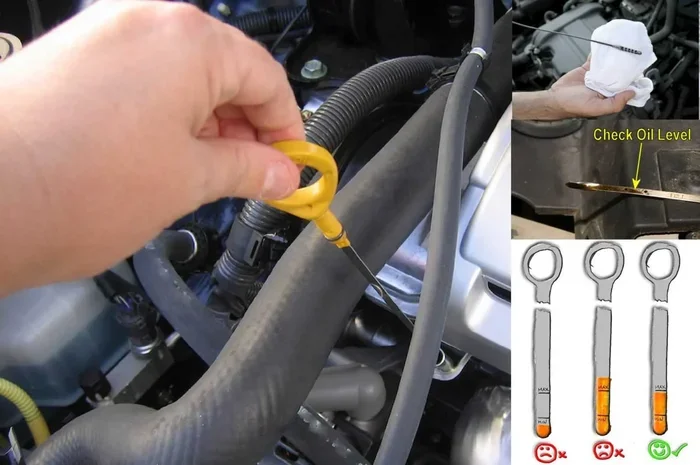
After adding oil, wait a few minutes for it to settle into the oil pan. Then pull the dipstick, wipe it clean, reinsert it fully, and pull it out again to check the level. The oil should fall between the minimum and maximum marks on the dipstick.
Check for Leaks and Clean Up
Start the engine and let it run for 30 seconds. Look under the car for any leaks around the drain plug and oil filter. If everything looks dry, turn off the engine and wait a couple of minutes for the oil to settle. Then check the dipstick one more time to confirm the level is correct.
Dispose of the old oil and filter properly. Many auto parts stores accept used oil for recycling. Never pour old oil down a drain or onto the ground.
Common Mistakes to Avoid During Oil Changes
Even experienced car owners make mistakes during oil changes. Here are some common errors and how to avoid them.
Skipping the Level Check
This is the biggest mistake people make. They change oil on a slight slope, assume it does not matter, and move on. As we have covered, an uneven surface affects drainage, oil level readings, and filter access. Always take a moment to confirm your car is level before starting.
Overfilling the Oil
It is easy to add too much oil, especially when you are not checking the dipstick frequently. Overfilled oil creates excess pressure in the engine. It can cause oil leaks, damaged seals, and in severe cases, engine failure. Add oil in small increments and check the level often.
Forgetting to Replace the Oil Filter
Some people drain the old oil and refill without changing the filter. This is a big mistake. The old filter is full of contaminants and debris. It will quickly pollute your fresh oil and reduce its effectiveness. Always install a new filter with every oil change.
Using the Wrong Oil Type
Not all engines use the same oil. Some require synthetic oil, while others work fine with conventional oil. Using the wrong oil type can affect engine performance, fuel economy, and longevity. Always refer to your owner’s manual or check with your dealer.
Ignoring the Oil Change Interval
Even the best oil degrades over time. Most modern cars have an oil life monitoring system that tells you when it is time for a change. You can also check at what percent oil life you should change oil to stay on track. Ignoring these reminders can lead to sludge buildup and reduced engine protection.
Expert Tips for the Best Oil Change Results
Want to get the most out of every oil change? Here are some expert-backed tips to keep your engine running smoothly.
Keep a Maintenance Log
Track every oil change in a notebook or app. Record the date, mileage, oil type, and filter used. This helps you stay on schedule and gives you a record to share with your mechanic if needed.
Check for Oil Leaks After the Change
After completing an oil change, drive the car for a few miles and then park it on a level surface again. Look underneath for any fresh oil spots. Catching a leak early can prevent costly repairs down the road.
Know When to Seek Professional Help
While changing oil is a great DIY project, some situations call for a professional. If your car has a hard-to-reach drain plug, a suspected oil leak, or warning lights like the maintenance required light, it may be best to visit a trusted mechanic. You can drive with a maintenance required light on for a short distance, but it is best to address the issue promptly.
Recycle Your Used Oil
Used engine oil is a hazardous material. Do not throw it in the trash or dump it outside. Take it to a recycling center or auto parts store that accepts used oil. Many stores even offer free recycling for used filters as well.
Frequently Asked Questions
Can I change my oil on a slightly sloped driveway?
A slight slope might not cause major problems, but it is best to avoid it. Even a small tilt can prevent complete oil drainage and give you an inaccurate dipstick reading. If you must use a sloped driveway, try to find the flattest spot available and double-check your oil level after the change.
How do I know if my car is level enough for an oil change?
You can use a small bubble level placed on the hood or trunk lid. If the bubble sits in the center, your car is level. You can also look at the car from the side and check if it appears even. Most paved driveways and garage floors are flat enough for a safe oil change.
What happens if I overfill my engine oil?
Overfilled oil creates excess pressure inside the engine. This can lead to oil leaks, foaming, and reduced lubrication. In severe cases, the oil can reach the crankshaft and cause damage. If you accidentally overfill, drain the excess oil until the level is correct on the dipstick.
Should I check my oil level after the car has been running?
No, always check the oil level when the engine is cool and has been sitting for a few minutes. This allows the oil to settle back into the oil pan for an accurate reading. Checking hot oil can give you a false low reading.
Can I change oil without lifting the car?
Yes, most cars have a drain plug that is accessible from underneath without lifting. You just need to slide a drain pan under the car. However, if your car has low ground clearance or the drain plug is difficult to reach, using a jack and jack stands on a level surface is recommended.
How often should I change my engine oil?
This depends on your vehicle, the type of oil you use, and your driving conditions. Most manufacturers recommend changing oil every 5,000 to 7,500 miles for conventional oil and every 7,500 to 10,000 miles for synthetic oil. You can also monitor your oil life percentage and change when it drops to around 15 percent. Check at what percent oil life should you change oil for your specific vehicle to stay on track.