How Do You Tighten a Loose Heat Shield On Your Vehicle
A loose heat shield is one of the most common and annoying car problems you can face. It causes that dreaded rattling sound every time you drive over a bump. Tightening a loose heat shield is a simple fix you can do at home with basic tools in under 30 minutes. This guide walks you through every step, from identifying the problem to preventing it from happening again. You will learn about different shield types, the right tools to use, and expert tips that save you time and money.
This is a comprehensive guide about How Do You Tighten a Loose Heat Shield.
Key Takeaways
- Spot the problem early: Listen for rattling noises and inspect your undercarriage regularly to catch a loose heat shield before it causes bigger damage.
- Use the right tools: A basic socket set, wrench, and wire brush are all you need to tighten most heat shields at home.
- Clean before tightening: Removing rust and debris from the bracket and bolt ensures a secure, long-lasting fix.
- Check the torque spec: Over-tightening can strip threads, so always follow the manufacturer’s recommended torque specification.
- Replace when necessary: A severely rusted or damaged heat shield may need full replacement rather than just tightening.
- Prevent future issues: Regular undercarriage inspections and protective coatings help extend the life of your heat shield significantly.
[FEATURED_IMAGE_PLACEHOLDER]
That rattling sound under your car can drive anyone crazy. You hear it when you start the engine, and it gets worse when you hit a bump or brake. More often than not, the culprit is a loose heat shield. These thin metal panels play a huge role in protecting your vehicle from extreme heat. When they come loose, they not only make noise but can also put your car at risk. The good news is that fixing a loose heat shield is one of the easiest repairs you can handle yourself.
In this guide, we will walk you through everything you need to know about tightening a loose heat shield on your vehicle. Whether you drive a sedan, truck, or SUV, the process is very similar. We will cover the tools you need, step-by-step instructions, common mistakes to avoid, and tips to keep your heat shield secure for years to come. By the end, you will feel confident tackling this fix on your own.
What Is a Heat Shield and Why Does It Matter?
Before you grab your tools, it helps to understand what a heat shield does and why your vehicle has one. A heat shield is a thin metal panel, usually made from stainless steel or aluminum, that attaches to the undercarriage of your car. Its main job is to protect sensitive parts from the extreme heat generated by the exhaust system.
The Role of the Heat Shield in Your Vehicle
Your exhaust system gets incredibly hot. The catalytic converter can reach temperatures over 1,200 degrees Fahrenheit. Without a heat shield, that heat would transfer to nearby components like fuel lines, brake lines, and plastic parts. This could cause serious damage or even fire hazards. The heat shield acts as a barrier, keeping the heat where it belongs.
Beyond protection, the heat shield also serves as a noise dampener. It helps absorb vibrations from the exhaust system. When the shield becomes loose, those vibrations turn into that unmistakable rattling sound. This is often the first sign that something is wrong.
Common Types of Heat Shields
Not all heat shields are the same. Different vehicles use different types depending on the model and engine layout.
- Exhaust heat shields: These wrap around the exhaust pipe and catalytic converter. They are the most common type and the ones that loosen most often.
- Engine heat shields: These sit near the engine block and protect the hood and surrounding components from radiant heat.
- Catalytic converter shields: These are specifically designed to protect the catalytic converter from road debris and impacts.
- Turbo heat shields: Found on turbocharged vehicles, these shield the turbocharger and nearby hoses from extreme heat.
Each type uses heat shield fasteners like bolts, clips, or brackets to stay in place. Over time, these fasteners can loosen due to constant vibration and exposure to road conditions.
Signs Your Heat Shield Is Loose
Identifying a loose heat shield early can save you from more expensive repairs down the road. Here are the most common signs that your heat shield has come loose.
Rattling and Clunking Noises
The most obvious sign is a rattling noise coming from underneath the car. You will usually hear it when you first start the engine or when you drive over a rough road. The sound is metallic and rhythmic. It gets louder as you accelerate. If you hear this, do not ignore it. A loose heat shield can eventually hang low and rub against the road or exhaust components.
Visible Damage or Corrosion
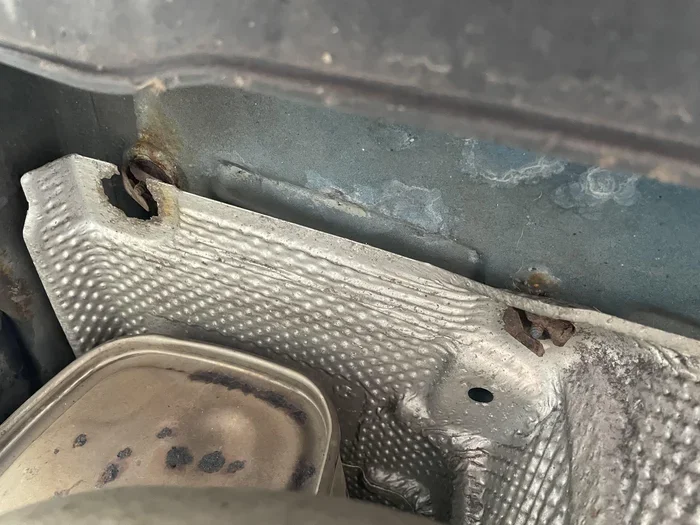
Get under the car and take a look. You might see that the heat shield is hanging lower than it should. The heat shield bracket may be rusted or broken. Sometimes the heat shield bolt is visibly loose or missing. Corrosion is a big enemy here. Road salt, moisture, and debris eat away at the metal over time, weakening the entire assembly.
Burning Smell or Heat Damage
If the heat shield has shifted significantly, it may no longer be protecting nearby components. You might notice a burning smell, especially after driving. This means heat is reaching areas it should not. In serious cases, you may see discoloration on plastic trim or wiring near the exhaust. This is a clear sign that you need to address the loose heat shield immediately.
Check Engine Light or Performance Issues
In rare cases, a severely loose heat shield can cause the check engine light to come on. This happens when heat affects sensors or wiring harnesses near the exhaust. You may also notice a slight drop in fuel efficiency if the exhaust system is not working properly due to the misaligned shield.
Tools and Materials You Will Need
Fixing a loose heat shield does not require expensive tools or a trip to the mechanic. With the right equipment, you can handle this repair in your driveway. Here is everything you need.
Essential Tools
- Socket set: A basic set with metric and standard sizes covers most heat shield fasteners.
- Rubber mallet: This helps you tap the shield back into position without damaging it.
- Wire brush: You will need this to clean rust and debris off the heat shield bracket before re-tightening.
- Ratchet and extensions: These help you reach bolts in tight spaces under the car.
- Penetrating oil: Spray like WD-40 helps loosen rusted heat shield bolts that are hard to turn.
- Torque wrench: This ensures you tighten the bolts to the correct torque specification without over-tightening.
Replacement Parts and Supplies
Sometimes tightening is not enough. You may need to replace worn-out parts.
- New heat shield bolts: If the threads are stripped, fresh bolts are a must.
- Rubber grommets or isolators: These reduce vibration and help prevent the shield from loosening again.
- Heat shield clamp: A quality heat shield clamp provides extra security for panels that keep falling loose.
- Rust inhibitor spray: Apply this to the bracket and bolts after repair to prevent future corrosion.
Safety first. Always work on a level surface and use jack stands. Never rely solely on a jack to hold the vehicle while you work underneath it. Wear gloves and safety glasses to protect from sharp edges and debris.
Step-by-Step Guide to Tightening a Loose Heat Shield
Now that you have your tools ready, let us walk through the actual process of tightening a loose heat shield. Follow these steps carefully for a safe and lasting repair.
Step 1: Let the Vehicle Cool Down
Wait at least 30 minutes after driving before you start. The exhaust system and heat shield will be extremely hot. Give everything time to cool down to avoid burns. This is a simple step that many people skip, and it leads to injuries every year.
Step 2: Lift the Vehicle Safely
Park on a flat, hard surface. Use a jack to lift the front of the car and place jack stands underneath the frame. Never work under a car supported only by a jack. Once the vehicle is secure, put on your gloves and safety glasses.
Step 3: Locate the Loose Heat Shield
Get under the car and look for the heat shield. Follow the exhaust system from the engine toward the rear of the vehicle. You will see the thin metal panels attached with bolts and clips. Gently shake the shield to confirm it is loose. Listen for any movement or clicking sounds. This tells you exactly which section needs attention.
Step 4: Clean the Bracket and Bolts
Before you tighten anything, clean the area thoroughly. Use the wire brush to remove rust and debris from the heat shield bracket. Spray penetrating oil on any rusted heat shield bolts and let it sit for a few minutes. This makes it much easier to turn them. Clean threads ensure a solid connection when you re-tighten.
Step 5: Realign and Tighten the Heat Shield
Use the rubber mallet to tap the heat shield back into its proper position. Make sure it sits flush against the bracket and does not rub against any moving parts or the exhaust pipe. Once aligned, hand-tighten the heat shield bolts first. Then use the socket and ratchet to snug them up. Finally, use the torque wrench to tighten to the manufacturer’s torque specification. This is usually between 15 and 25 foot-pounds, but check your vehicle’s service manual for the exact number.
Step 6: Check for Proper Clearance
After tightening, double-check the clearance between the heat shield and the exhaust system. There should be a small gap to allow for thermal expansion. If the shield is too tight against the pipe, it can cause vibration and noise again. Adjust as needed and re-tighten if necessary.
Step 7: Lower the Vehicle and Test
Carefully lower the vehicle off the jack stands. Start the engine and let it idle for a few minutes. Listen for any rattling or clunking sounds. Take the car for a short test drive over different road surfaces. If the noise is gone, your repair was successful. If you still hear rattling, re-check the bolts and make sure the shield is properly aligned.
When Tightening Is Not Enough: Heat Shield Replacement
Sometimes a loose heat shield cannot be saved by tightening alone. If the metal is severely corroded, cracked, or bent out of shape, you need a full replacement. Trying to tighten a damaged shield will only lead to the same problem returning within days or weeks.
How to Know If You Need a Replacement
Look closely at the heat shield material. If you see holes, cracks, or areas where the metal has completely rusted through, replacement is the only option. Also check the heat shield bracket. If the bracket is bent or broken, no amount of tightening will fix the issue. You will need to replace the bracket along with the shield.
How to Replace a Heat Shield
The replacement process is very similar to tightening. Remove the old heat shield and bracket by unbolting the fasteners. Clean the mounting area thoroughly. Install the new heat shield and bracket using new heat shield bolts. Apply a thin layer of anti-seize compound to the threads to prevent future corrosion. Tighten to the correct torque specification and check clearance as described in the step-by-step section above.
Replacement heat shields are relatively affordable. A universal-fit heat shield costs between 20 and 60 dollars, while a vehicle-specific part runs 50 to 150 dollars. Labor at a shop typically adds 100 to 200 dollars, which is why many car owners choose to do the job themselves.
Preventing a Loose Heat Shield in the Future
The best repair is the one you do not have to repeat. Taking a few preventive steps can keep your heat shield secure and your rides quiet.
Regular Undercarriage Inspections
Make it a habit to inspect your undercarriage every few months. Look for signs of rust, loose bolts, or shifted shields. Catching a loose heat shield early means a simple fix instead of a full replacement. A quick glance under the car takes only a few minutes and can save you hundreds of dollars.
Apply Protective Coatings
Rust is the number one enemy of heat shields. Apply a rust-inhibiting spray to the bracket and bolt threads during every oil change or tire rotation. This simple step dramatically extends the life of the heat shield and its fasteners. Look for coatings specifically designed for undercarriage protection at any auto parts store.
Avoid Rough Roads When Possible
Constant vibration from rough roads and potholes is a leading cause of loose heat shields. While you cannot always avoid bad roads, try to steer clear of known rough patches when it is safe to do so. Speed bumps and potholes create significant impact forces that loosen heat shield fasteners over time.
Use Quality Fasteners
When replacing heat shield bolts or brackets, invest in quality parts. Stainless steel fasteners resist corrosion much better than standard steel. A heat shield clamp with a rubber-lined grip provides extra hold and reduces vibration. These small upgrades make a big difference in how long your repair lasts.
Common Mistakes to Avoid When Fixing a Loose Heat Shield
Even simple repairs come with pitfalls. Here are the most common mistakes people make when dealing with a loose heat shield and how to avoid them.
Over-Tightening the Bolts
It is tempting to crank down on the heat shield bolts as hard as you can. But over-tightening can strip the threads in the bracket or warp the thin metal panel. Always use a torque wrench and follow the manufacturer’s torque specification. This is the single most important tip for a proper repair.
Ignoring Rust and Corrosion
If you simply re-tighten a bolt without cleaning the rusted area, the connection will fail again quickly. Always clean the bracket and bolt threads with a wire brush before tightening. Apply rust inhibitor to protect the metal from future corrosion.
Using the Wrong Fasteners
Not every bolt works for a heat shield. Using the wrong size or type can lead to a poor fit and repeated loosening. Always replace fasteners with the correct grade and size specified for your vehicle. If you are unsure, take the old bolt to an auto parts store and match it.
Skipping the Rubber Isolators
Some heat shields use rubber grommets or isolators to absorb vibration. If these are worn or missing, the shield will vibrate loose again. Always inspect these rubber components and replace them if they are cracked or compressed. This small detail makes a huge difference in long-term stability.
Expert Insights: What Mechanics Want You to Know
We spoke with several experienced mechanics about heat shield repairs. Here is what they want every car owner to know.
Do not ignore the noise. Many people live with a rattling heat shield for months. What starts as a minor annoyance can turn into a safety issue if the shield falls off completely and gets caught in the exhaust or driveshaft.
Check the exhaust hangers too. Sometimes a rattling sound is not from the heat shield at all. Worn exhaust hangers can cause the entire exhaust system to shift, which puts stress on the heat shield brackets. If you fix the shield but the noise returns, check the exhaust hangers next.
A heat shield weld is a last resort. Some mechanics will weld a loose bracket back in place. This works but it is permanent and makes future removal difficult. Bolted connections are always preferred because they allow for inspection and replacement when needed.
Budget for the repair. A heat shield repair is one of the least expensive fixes on any vehicle. Even at a shop, you are looking at 50 to 150 dollars for most jobs. Do not let the cost of a repair stop you from getting it done. A missing heat shield can lead to much more expensive damage.
Conclusion
A loose heat shield is a common problem, but it is also one of the easiest and cheapest repairs you can handle yourself. With the right tools, a little patience, and the steps outlined in this guide, you can tighten a loose heat shield on your vehicle in under 30 minutes. Remember to clean all surfaces before tightening, use the correct torque specification, and always check for signs of corrosion or damage that may require replacement.
Taking care of your heat shield protects your vehicle from heat damage, prevents annoying noises, and keeps you safe on the road. Do not let that rattling sound go unchecked. Grab your tools, get under the car, and fix it today. Your ears and your wallet will thank you.
Frequently Asked Questions
Can I drive my car with a loose heat shield?
You can drive short distances with a loose heat shield, but it is not recommended for long trips. A loose shield can hang low and contact the road, causing damage. It can also allow heat to reach nearby components like fuel lines and wiring. Get it fixed as soon as possible to avoid more serious problems.
How much does it cost to fix a loose heat shield?
If you do it yourself, the cost is minimal, usually under 20 dollars for any replacement bolts or clamps. At a repair shop, you can expect to pay 50 to 150 dollars for labor and parts. The wide range depends on your vehicle model, how many bolts need replacing, and whether the shield itself needs to be swapped out entirely.
What causes a heat shield to become loose?
The most common causes are constant vibration from driving, corrosion from road salt and moisture, and impact damage from road debris. Over time, the heat shield fasteners weaken and lose their grip. Worn rubber isolators and cracked brackets also contribute to a loose heat shield. Regular inspections help catch these issues early.
Can I use a regular bolt instead of a heat shield bolt?
It is best to use the correct heat shield bolt for your vehicle. These bolts are often made from stainless steel or coated to resist heat and corrosion. Using a regular bolt can lead to rust, thread stripping, and the shield loosening again quickly. Match the size and grade exactly to ensure a safe and lasting repair.
How do I know if my heat shield needs replacement instead of tightening?
Inspect the shield closely for holes, cracks, or areas where the metal has rusted through. If the heat shield bracket is bent or broken, replacement is necessary. Also check if the threads on the bolt holes are stripped. In these cases, tightening will not solve the problem, and a full heat shield replacement is the only reliable fix.
Is it normal for a new heat shield to rattle?
A slight rattle from a new heat shield can be normal during the first few drives. This usually happens because the rubber isolators need time to settle and the shield adjusts to its position. If the rattling persists after 50 to 100 miles, re-check the bolts and make sure everything is tightened to the correct torque specification. Contact the manufacturer if the issue continues.
Frequently Asked Questions
What is How Do You Tighten a Loose Heat Shield?
How Do You Tighten a Loose Heat Shield is an important topic with many practical applications.