How to Replace the Alternator on a 2013 Hyundai Elantra
Replacing the alternator on a 2013 Hyundai Elantra is a manageable DIY alternator replacement job. This guide walks you through every step, from removing the serpentine belt to testing the new unit. You’ll save hundreds of dollars compared to a shop visit.
If your 2013 Hyundai Elantra is showing signs of a failing alternator, you’re not alone. The alternator is the heart of your vehicle’s electrical system, keeping the battery charged and powering everything from the headlights to the infotainment system. When it starts to fail, you might notice dimming lights, a dead battery, or a warning light on the dashboard. Many car owners assume they need to visit a mechanic, but replacing the alternator on a 2013 Hyundai Elantra is a task you can handle at home with basic tools.
This step-by-step guide will walk you through the entire process. We’ll cover the tools you need, how to remove the old unit, and how to install a new one. You’ll also learn about common mistakes to avoid and how to test your work. By the end, you’ll have the confidence to complete this car maintenance job yourself.
The 2013 Hyundai Elantra uses a serpentine belt-driven alternator, which means the belt loops around multiple components. While this setup can seem intimidating, the process is straightforward once you understand the steps. Let’s dive in.
Key Takeaways
- Know your tools: A basic socket set, serpentine belt tool, and multimeter are all you need for this alternator replacement.
- Safety first: Disconnect the negative battery terminal before starting any work on the electrical system.
- Belt tension matters: Properly releasing the serpentine belt tensioner prevents damage to the belt and pulleys.
- Check the wiring: Inspect the alternator connectors and harness for corrosion before installing the new unit.
- Test after installation: Use a multimeter to verify the charging voltage is between 13.5 and 14.5 volts.
- Avoid common mistakes: Forgetting to reconnect the battery or overtightening bolts are the top errors people make.
📑 Table of Contents
Understanding the Alternator in Your 2013 Hyundai Elantra
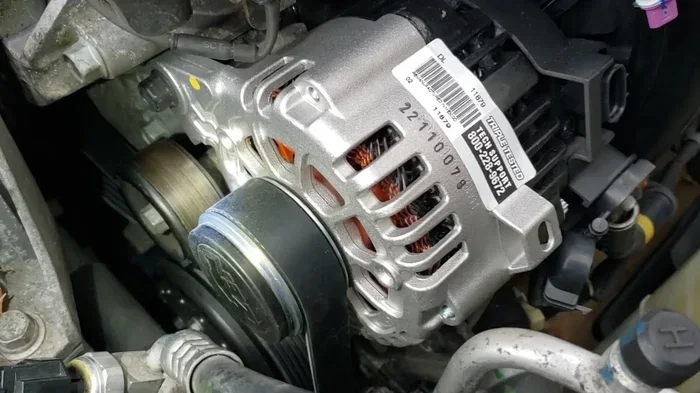
The alternator converts mechanical energy into electrical energy. It keeps the battery charged and powers all electrical components while the engine runs. In the 2013 Hyundai Elantra, the alternator is located on the front of the engine, driven by the serpentine belt. Knowing its location helps you plan your approach.
A healthy alternator should output between 13.5 and 14.5 volts. If your voltage drops below 13 volts, the battery isn’t getting enough charge. You might experience slow cranking, flickering lights, or a dead battery after the car sits for a few days. These symptoms often point to a failing alternator rather than a bad battery.
A failing alternator often triggers the check engine light to turn on, which can be confusing. Don’t assume the light means the battery is bad. The charging system is a closed loop, and a weak alternator starves the battery of power, leading to a cascade of electrical issues.
Signs Your Alternator Is Failing
- Dashboard warning light (battery or charging light)
- Dimming headlights, especially at idle
- Electrical accessories working intermittently
- Battery warning message on the instrument cluster
- Strange whining or grinding noise from the engine bay
If you notice any of these, it’s time to inspect the alternator. A quick test with a multimeter can confirm whether the unit is still charging properly. If the voltage is low, you’ll need to perform an alternator replacement.
Tools and Materials You’ll Need
Gathering the right tools before you start makes the job much smoother. Here’s what you’ll need for this DIY alternator replacement:
- Socket set (10mm, 12mm, 14mm, 15mm)
- Serpentine belt tensioner tool
- Ratchet and extension
- Torque wrench
- Multimeter
- Safety glasses and gloves
- New alternator (OEM or quality aftermarket)
- Dielectric grease for connectors
You can find a suitable replacement alternator for the 2013 Hyundai Elantra at most auto parts stores. I recommend choosing an OEM unit for reliability, but a reputable aftermarket part works well too. Make sure the new alternator matches the part number for your specific engine variant.
Quick Tip: Check the Belt Condition
While you’re under the hood, inspect the serpentine belt for cracks, glazing, or fraying. If the belt is worn, replace it at the same time. A new belt ensures proper tension and prevents future issues. This is an easy way to save time later.
How to Replace the Alternator on a 2013 Hyundai Elantra
Follow these steps carefully to complete the alternator replacement on your 2013 Hyundai Elantra. Take your time and work in a well-ventilated area.
Step 1: Prepare the Vehicle
Park the car on a level surface and turn off the engine. Engage the parking brake. Open the hood and locate the negative battery terminal. Use a 10mm wrench to loosen the nut and remove the cable. Place the cable aside, ensuring it doesn’t touch the terminal. This step is critical for safety. Working on a live electrical system can cause shorts or shocks.
Next, locate the alternator. On the 2013 Hyundai Elantra, it sits near the front of the engine, towards the passenger side. You’ll see the serpentine belt looping around it. Take a photo of the belt routing before you do anything. This reference will help you reinstall everything correctly.
Step 2: Remove the Serpentine Belt
The serpentine belt tensioner applies pressure to keep the belt tight. Insert the serpentine belt tool into the tensioner pulley. Rotate it clockwise to release tension. While holding tension, slide the belt off the alternator pulley. Slowly release the tensioner. The belt should come off easily.
Before removing the belt completely, note the routing. Some engines have the belt looping over the crankshaft pulley, then the alternator, then the A/C compressor. The photo you took earlier will be invaluable here. If the belt is old, this is the perfect time to replace it.
Step 3: Detach the Alternator
Now you need to unplug the electrical connectors from the back of the alternator. There’s usually a main power plug and a smaller sensing plug. Press the locking tabs and gently pull them free. Spray a little electrical contact cleaner on the connectors if they look corroded.
Next, remove the mounting bolts that hold the alternator in place. The 2013 Hyundai Elantra typically has two or three bolts. Use the appropriate socket and turn them counterclockwise. Keep track of the bolts and any washers. Once all bolts are out, carefully wiggle the alternator free. It might be tight, so use a pry bar gently if needed.
If you’ve ever dealt with a dead battery, you might have read about jump starting a car with a bad alternator. That situation happens when the alternator fails to charge the battery, leaving you stranded. This is exactly why timely replacement matters.
Step 4: Install the New Alternator
Take your new alternator and position it in the mounting bracket. Align the holes with the mounting points. Insert the bolts and hand-tighten them first. Once everything is aligned, use a torque wrench to tighten the bolts to the manufacturer’s specification. Over-tightening can strip the threads or crack the mounting bracket.
Reconnect the electrical connectors. Apply a thin layer of dielectric grease to the terminals before plugging them in. This prevents corrosion and ensures a solid connection. Push each connector firmly until you hear the locking click.
Step 5: Reinstall the Serpentine Belt
Route the serpentine belt over all the pulleys according to your photo. Make sure the belt sits snugly in the grooves of each pulley. Use the serpentine belt tool to rotate the tensioner again. Slide the belt onto the alternator pulley last. Slowly release the tensioner. The belt should now be tight and properly seated.
Double-check that the belt isn’t twisted or overlapping. A misrouted belt can cause noise or damage to components. Spin each pulley by hand to ensure the belt tracks correctly.
Step 6: Reconnect the Battery and Test
Reattach the negative battery terminal and tighten the nut. Start the engine and let it idle. Turn on the headlights and other electrical accessories. Use your multimeter to check the voltage at the battery terminals. A healthy charging voltage should read between 13.5 and 14.5 volts.
If the voltage is low, double-check the alternator connections. Sometimes the connectors don’t seat fully. If the voltage is good, you’ve successfully completed the alternator replacement. However, if you see a warning light on the dashboard, you may need to manually clear your car codes. A fault code from the old alternator can linger and trigger the light even after the repair.
Common Mistakes to Avoid
Even with a clear guide, mistakes happen. Here are the most common errors people make when replacing the alternator on a 2013 Hyundai Elantra:
- Forgetting to disconnect the battery: This can lead to electrical shorts or blown fuses. Always remove the negative terminal first.
- Mixing up bolt lengths: The mounting bolts are different lengths. Installing a long bolt in a short hole can damage the engine block.
- Ignoring the serpentine belt tension: A loose belt will slip and cause the alternator to undercharge. Make sure the tensioner is fully released and the belt is tight.
- Not testing the new alternator: Don’t assume the new part works out of the box. Always verify the charging voltage before closing the hood.
- Reusing old connectors: Corroded connectors can cause intermittent charging issues. Clean them or replace them if necessary.
Avoiding these pitfalls will save you time and prevent comebacks. Take your time and follow each step carefully.
OEM vs Aftermarket Alternator Comparison
| Feature | OEM Alternator | Aftermarket Alternator |
|---|---|---|
| Price Range | $250 – $400 | $120 – $250 |
| Warranty | Typically 3 years | Varies (1–3 years) |
| Fit and Finish | Exact match | Generally good, minor differences |
| Availability | Dealer only | Widely available online and in stores |
| Durability | Excellent | Good to excellent with quality brands |
Both options can get the job done. The OEM unit offers peace of mind with a perfect fit, while a quality aftermarket part can save you a significant amount of money. Choose a brand with solid reviews and a solid warranty.
When to Seek Professional Help
While this is a DIY-friendly repair, there are times when you should call a professional. If the alternator is located in a tight spot that makes access difficult, a mechanic may have the right tools to work faster. Additionally, if you notice unusual noises after installation, it could indicate a misaligned pulley or a faulty belt tensioner.
Also, if your 2013 Hyundai Elantra has other electrical issues beyond the alternator, a professional can diagnose the root cause. Sometimes a failing voltage regulator or a parasitic drain mimics alternator symptoms. A qualified technician can test the entire charging system and make sure everything is in order.
Remember, it’s okay to ask for help. If you feel unsure about any step, a quick visit to a trusted shop can prevent costly mistakes. Many garages offer free diagnostics and can confirm whether your alternator is indeed the culprit.
Conclusion
Replacing the alternator on a 2013 Hyundai Elantra is a rewarding DIY project that saves money and builds your mechanical skills. With the right tools, a little patience, and this guide, you can complete the job in about an hour. You’ll walk away with a fully functioning charging system and the satisfaction of a job well done.
Always remember to test your work with a multimeter and clear any fault codes if needed. The alternator is a critical component, and getting it right ensures your Elantra runs reliably for miles to come. Don’t hesitate to tackle this car maintenance task—your wallet and your car will thank you.
Frequently Asked Questions
What is How to Replace the Alternator on a 2013 Hyundai Elantra?
How to Replace the Alternator on a 2013 Hyundai Elantra is an important topic with many practical applications.