How Many Miles Is a Complete Drive Cycle Explained
A complete drive cycle typically covers between 15 and 30 miles of mixed driving, including both city and highway conditions. The exact drive cycle miles depend on your vehicle make, model, and the specific readiness monitors that need to run. Completing this cycle properly ensures your onboard diagnostics system reports all systems as ready for your next emissions test.
If you have ever stared at your dashboard and seen that little check engine light, you know the panic that follows. One of the first things a mechanic or emissions testing center will tell you is that you need to complete a complete drive cycle. But what does that actually mean? How many miles is a complete drive cycle, and why does it matter so much for your vehicle emissions test?
In this article, we break down everything you need to know about the drive cycle. We will walk you through the exact mileage, the steps involved, common mistakes to avoid, and practical tips to make sure you pass your next emissions test without any headaches. Whether you are preparing for a smog check or just trying to clear a code from your onboard diagnostics system, this guide has you covered.
Key Takeaways
- Drive Cycle Distance: A complete drive cycle usually requires 15 to 30 miles of varied driving conditions.
- Readiness Monitors Matter: All OBD-II readiness monitors must show “ready” status before you pass an emissions test.
- Mixed Driving Is Key: You need both city driving and highway driving to complete all drive cycle steps.
- Cold Start Is Essential: The cycle must begin with a cold engine, meaning the car has sat unused for at least 8 hours.
- Common Mistakes Derail the Process: Turning off the engine too early or driving only short trips can reset your progress.
- Preparation Helps: Fixing any check engine light issues before attempting the drive cycle saves time and frustration.
📑 Table of Contents
- What Is a Complete Drive Cycle?
- How Many Miles Does a Complete Drive Cycle Take?
- What Happens During Each Step of a Drive Cycle?
- Why Completing a Complete Drive Cycle Matters
- How to Successfully Complete a Drive Cycle
- Common Mistakes That Prevent Drive Cycle Completion
- Drive Cycle Tips for Passing Your Emissions Test
- Conclusion
What Is a Complete Drive Cycle?
Understanding the Basics of a Drive Cycle
A complete drive cycle is a specific sequence of driving conditions designed to test every emission-related system in your vehicle. Think of it as a full health check for your car’s emission control system. When you drive your car under certain conditions, the powertrain control module (PCM) runs a series of self-tests called readiness monitors.
These monitors check things like your catalytic converter, oxygen sensor, fuel system, ignition system, and more. Each monitor needs to run through its specific test range to confirm everything is working properly. A complete drive cycle means all of these monitors have run and reported their results successfully.
The drive cycle is not just about covering a certain number of miles. It is about hitting the right driving conditions in the right order. Your car needs to experience cold starts, idle periods, acceleration, steady highway speeds, and deceleration. Each phase triggers different monitors to run their tests.
How the Onboard Diagnostics System Works
Your vehicle’s onboard diagnostics system, known as OBD-II, has been standard in all cars sold in the United States since 1996. This system constantly monitors your engine and emission controls. When it detects a problem, it stores a trouble code and may trigger the check engine light.
However, the OBD-II system does not run all of its tests at once. Some monitors need specific conditions to activate. For example, the EVAP system monitor requires a cold start followed by a specific driving pattern. The catalyst monitor needs the engine to reach a certain operating temperature and maintain steady speeds. This is why a single short trip is never enough to complete a drive cycle.
How Many Miles Does a Complete Drive Cycle Take?
The Short Answer: 15 to 30 Miles
So, how many miles is a complete drive cycle? The general answer is between 15 and 30 miles. However, this number can vary depending on several factors. The exact drive cycle miles depend on your vehicle’s make and model, the specific readiness monitors that need to run, and the driving conditions you encounter.
For most vehicles, you will need a combination of city driving and highway driving. A typical drive cycle might include 5 to 10 miles of city-style driving with stops, starts, and idle periods. Then you will need 5 to 10 miles of highway driving at steady speeds, usually between 55 and 65 miles per hour. The remaining distance covers additional test conditions like deceleration and sustained cruising.
City Driving vs. Highway Driving Requirements
City driving conditions are essential because they test your vehicle’s response to stop-and-go traffic, low-speed acceleration, and idle periods. During city-style driving, the fuel system monitor checks your fuel trim values, and the oxygen sensor monitor verifies that the sensor is responding correctly to changes in exhaust gases.
Highway driving is equally important because it allows the engine to reach and maintain full operating temperature for an extended period. This is when the catalytic converter monitor runs its efficiency test, and the ignition system monitor checks for any engine misfire codes. Without sufficient highway driving, these monitors may never activate.
Here is a simple breakdown of what a typical drive cycle looks like in terms of mileage:
- Cold start phase: 0 to 3 miles (engine must be cold, meaning the car has sat for at least 8 hours)
- City driving phase: 5 to 10 miles (mixed speeds, stops, and idling)
- Highway driving phase: 5 to 10 miles (steady speeds of 55 to 65 mph)
- Cool-down phase: 2 to 5 miles (gradual deceleration and final idle)
When you add these up, you get roughly 15 to 30 miles for a full complete drive cycle. Some vehicles may need slightly more or less, but this range covers the vast majority of cars and trucks on the road today.
Factors That Affect Drive Cycle Mileage
Several factors can change how many miles you need to complete a full drive cycle. Let us look at the most common ones.
Vehicle age and model: Older vehicles or those with more complex emission control systems may require longer cycles. Newer models with advanced onboard diagnostics sometimes have more monitors that need to run.
Driving conditions: If you are stuck in heavy traffic, your drive cycle will take longer because you spend more time idling and less time at highway speeds. Conversely, a clear road with steady flow makes the process faster.
Ambient temperature: Cold weather can affect how quickly your engine reaches operating temperature, which may extend the distance needed. Hot weather can sometimes speed things up.
Vehicle condition: If your car has existing issues like a faulty oxygen sensor or a weak catalytic converter, the monitors may not complete their tests, forcing you to repeat portions of the cycle.
What Happens During Each Step of a Drive Cycle?
The Cold Start
Every complete drive cycle begins with a cold start. This means your engine must be cold, which typically requires the vehicle to have sat unused for at least 8 hours. When you start the engine from cold, the fuel system monitor begins its first test. The powertrain control module checks the fuel trim values to ensure the engine is getting the right air-fuel mixture.
During this phase, you should let the engine idle for a few minutes. Do not rev the engine or drive aggressively. Just let the car warm up naturally. This idle period allows the oxygen sensor to warm up and begin providing accurate readings.
City Driving Phase
After the initial idle, you will need to drive under city-like conditions. This means moderate speeds, frequent stops, and smooth acceleration. You should drive at speeds between 20 and 45 miles per hour, with several stops along the way.
During this phase, several readiness monitors activate. The EVAP system monitor checks for leaks in the evaporative emission control system. The secondary air injection monitor tests the air injection pump. The misfire monitor watches for any engine misfire events. Each of these needs enough time and driving conditions to complete its test.
Highway Driving Phase
The highway phase is where your vehicle reaches sustained higher speeds. You should drive at a steady 55 to 65 miles per hour for several miles. This allows the engine to operate at a consistent load and temperature.
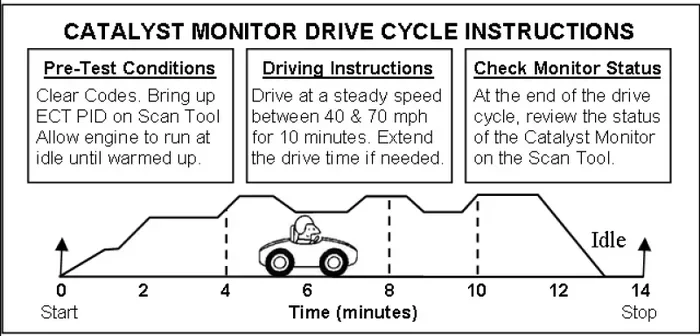
The catalyst monitor is one of the most important monitors that runs during this phase. It measures how efficiently your catalytic converter is reducing harmful emissions. The oxygen sensor monitor also runs a more comprehensive test at highway speeds, comparing the sensor’s response time against expected values.
Deceleration and Cool-Down
The final phase of a drive cycle involves gradual deceleration and a cool-down period. You should slow down naturally without braking hard. This allows the powertrain control module to record data during a closed-throttle condition.
After decelerating, let the engine idle again for a few minutes as it cools down. This final idle period allows any remaining monitors to complete their last checks. Once all monitors have finished their tests, they will report a “ready” status.
Why Completing a Complete Drive Cycle Matters
Passing Your Emissions Test
The most common reason people need to complete a drive cycle is to pass an emissions test or smog check. When a testing center hooks up their OBD-II scanner to your vehicle, it reads the status of all readiness monitors. If any monitor shows “not ready,” the test will fail automatically in many states.
This is a huge deal because a “not ready” status does not necessarily mean something is wrong with your car. It simply means the onboard diagnostics system has not yet completed all of its self-tests. Completing a complete drive cycle tells the system to run all tests and report “ready” for each one.
Clearing Check Engine Light Codes
If you have had a check engine light repaired and the codes cleared, you need a complete drive cycle to verify that the repair worked. The OBD-II system will re-run all the monitors during the cycle. If the problem is truly fixed, all monitors will report ready and the check engine light will stay off.
However, if a monitor fails again during the drive cycle, the check engine light will come back on. This tells you that the repair did not fully resolve the issue, and you need to investigate further.
Ensuring Your Vehicle Runs Properly
Beyond just passing tests, completing a drive cycle helps ensure your vehicle is running as efficiently as possible. The fuel system monitor, for example, adjusts your fuel trim based on what it learns during the cycle. A properly completed drive cycle means your engine is getting the most accurate fuel adjustments.
This can improve your fuel economy, reduce emissions, and even extend the life of components like your catalytic converter and oxygen sensor. In short, a complete drive cycle is good for your car’s overall health.
How to Successfully Complete a Drive Cycle
Step-by-Step Drive Cycle Procedure
Follow these steps to complete a complete drive cycle successfully. The process works for most vehicles, but always check your owner’s manual for model-specific instructions.
- Start with a cold engine. Make sure the car has sat for at least 8 hours. Do not drive it to warm it up first.
- Start the engine and let it idle. Allow the engine to warm up for 2 to 3 minutes without driving.
- Drive at moderate city speeds. Cover 5 to 10 miles with stops, starts, and speeds between 20 and 45 mph.
- Transition to highway driving. Find a highway or open road and maintain 55 to 65 mph for 5 to 10 miles.
- Decelerate gradually. Slow down naturally without hard braking. Let the engine coast down.
- Allow the engine to idle again. Park the car and let it sit with the engine running for 2 to 3 minutes.
- Turn off the engine. The readiness monitors should now report all systems as ready.
After completing these steps, you can use an OBD-II scanner to check the status of your readiness monitors. All monitors should show “ready” or “complete.” If any still show “not ready,” you may need to repeat portions of the cycle.
Quick Tips for a Successful Drive Cycle
- Plan your route: Choose a route that includes both city streets and a highway or open road. This saves time and ensures you hit all the required conditions.
- Avoid hard braking: Sudden stops can reset some monitors or trigger misfire codes. Drive smoothly throughout the cycle.
- Do not turn off the engine mid-cycle: If you stop for gas or a traffic light, keep the engine running. Turning off the engine can reset your progress.
- Check your fuel level: Start with at least a half tank of fuel. Low fuel levels can affect fuel trim readings and cause monitors to fail.
- Drive during daylight hours: This makes it easier to monitor your speed and driving conditions, especially if you are unfamiliar with the route.
Common Mistakes That Prevent Drive Cycle Completion
Driving Too Short Distances
The most common mistake is assuming a quick trip around the block counts as a complete drive cycle. Short trips of 2 to 3 miles will not activate all the readiness monitors. Most monitors need sustained driving at various speeds and temperatures to complete their tests.
If you only drive short distances around town, the fuel system monitor might run, but the catalyst monitor and EVAP monitor will likely remain incomplete. This is why you need at least 15 to 30 miles of mixed driving to finish a full cycle.
Ignoring Existing Engine Problems
If your check engine light is already on, attempting a drive cycle is a waste of time. The OBD-II system will detect the existing problem and may prevent certain monitors from completing. Always diagnose and repair any active codes before trying to complete a drive cycle.
Common issues that block the drive cycle include a loose gas cap, a failing oxygen sensor, a faulty catalytic converter, or an engine misfire. Fix these first, clear the codes, and then attempt the cycle.
Not Following the Correct Sequence
The drive cycle must begin with a cold start. If your engine is already warm when you begin driving, some monitors will not activate properly. This is why you should always start the process first thing in the morning or after the car has sat unused for several hours.
Another mistake is skipping the highway driving phase. Some people try to complete the cycle using only city driving. This will not work because the catalyst monitor and several other monitors require sustained highway speeds to run their tests.
Drive Cycle Tips for Passing Your Emissions Test
Preparing Your Vehicle Before the Test
Before you attempt a complete drive cycle, take some time to prepare your vehicle. Start by checking your fuel cap to make sure it is tight and not damaged. A loose or faulty gas cap is one of the most common reasons for EVAP system codes and failed emissions tests.
Next, check your fluid levels. Low coolant, low oil, or low transmission fluid can all affect how your engine runs during the drive cycle. Make sure your tires are properly inflated as well, since tire pressure can affect the fuel system monitor readings.
If you have recently had any work done on your vehicle, such as replacing the oxygen sensor or cleaning the catalytic converter, make sure all connections are secure and nothing was left unplugged. A loose connector can cause monitor failures during the drive cycle.
What to Do If Readiness Monitors Are Not Ready
If you have completed a drive cycle and some monitors still show “not ready,” do not panic. This is more common than you might think. The easiest fix is to simply drive the car normally for a few days. Normal daily driving often completes any remaining monitors that did not activate during a single cycle.
If monitors still do not complete after several days of normal driving, try repeating the drive cycle procedure. Make sure you are following all the steps correctly, starting with a truly cold engine. You can also try a different route that includes more varied driving conditions.
In some cases, a persistent “not ready” status may indicate an actual problem with your vehicle. If this happens, have a mechanic run a diagnostic check using an OBD-II scanner. They can read any pending codes and identify the root cause before it becomes a bigger issue.
Conclusion
A complete drive cycle is an essential process for any vehicle owner preparing for an emissions test or dealing with a check engine light. As we have covered, a complete drive cycle typically requires between 15 and 30 miles of mixed driving that includes cold starts, city conditions, highway speeds, and gradual deceleration.
The key to success is patience and following the correct sequence. Start with a cold engine, drive smoothly through both city and highway conditions, and avoid turning off the engine mid-cycle. By completing your drive cycle properly, you ensure that all readiness monitors report ready, which is exactly what testing centers and OBD-II scanners look for.
Remember, the drive cycle is not just about passing a test. It is about making sure your vehicle’s emission control system is functioning correctly. A properly completed complete drive cycle means your car is running cleaner, more efficiently, and more reliably. So the next time you need to complete a drive cycle, take your time, follow the steps, and drive confidently knowing you are doing right by your vehicle.
Frequently Asked Questions
Can I complete a drive cycle in less than 15 miles?
It is very unlikely to complete a full complete drive cycle in under 15 miles. Most vehicles need at least 15 to 30 miles of mixed driving to activate all readiness monitors. Short trips may activate a few monitors, but critical ones like the catalyst monitor and EVAP monitor require longer driving conditions to run their tests.
What happens if I turn off the engine during a drive cycle?
Turning off the engine mid-cycle can reset your progress and prevent some readiness monitors from completing. If this happens, you may need to start the drive cycle over from the beginning with a cold engine. Always try to complete the full cycle without stopping the engine.
Do I need a special OBD-II scanner to check drive cycle status?
You can use a basic OBD-II scanner to check the status of your readiness monitors. Many auto parts stores offer free scanning services. A more advanced scanner will give you detailed information about which specific monitors are still incomplete, which can help you know what to focus on during your next drive cycle.
How long should I let my car idle during the cold start phase?
Let the engine idle for about 2 to 3 minutes during the cold start phase. This gives the oxygen sensor and other components time to warm up and begin providing accurate readings. Do not rev the engine or drive aggressively during this idle period.
Will a check engine light prevent me from completing a drive cycle?
Yes, an active check engine light can prevent certain readiness monitors from completing. If the light is on, have the issue diagnosed and repaired first. Once the repair is done and the codes are cleared, you can then attempt the complete drive cycle to verify that the fix worked.
How often do I need to complete a drive cycle?
You typically only need to complete a drive cycle after clearing OBD-II codes or before an emissions test. Normal daily driving will keep your readiness monitors in ready status once they have all been completed successfully. You do not need to repeat the cycle regularly unless codes are cleared again.