How Do You Get Stickers Off Windows Without Any Damage
Removing stickers from windows doesn’t have to be a nightmare. Whether it’s an old bumper sticker, a window decal, or stubborn adhesive residue, the right technique makes all the difference. This guide walks you through multiple proven methods that protect your glass and clear coat. You’ll learn simple tricks using heat, household items, and commercial products. Each method is easy to follow and works on both car and home windows.
Have you ever stared at a stubborn sticker on your car window and wondered how on earth you’d get it off? Maybe it’s a promotional decal from a dealership. Maybe it’s an old bumper sticker from a concert you attended years ago. Or perhaps it’s a window tint overlay that just won’t cooperate. Whatever the reason, you’re here because you want to know how to get stickers off windows without causing any damage.
The good news is that you don’t need expensive tools or professional help. Most sticker removal jobs can be handled right at home with items you probably already have. The key is understanding how adhesive works and choosing the right method for your specific situation. In this guide, we’ll walk you through every step, from loosening the sticker to cleaning up the leftover residue. By the end, your windows will look brand new.
We’ve tested these methods on everything from sedan rear windows to truck side panels. Whether you’re dealing with a fresh sticker or one that’s been baking in the sun for five years, there’s a solution below that will work for you. Let’s dive in and get those windows looking clean again.
Key Takeaways
- Heat is your best friend: A hair dryer or heat gun softens adhesive, making sticker removal quick and safe.
- Household items work great: Things like vinegar, rubbing alcohol, and cooking oil can dissolve sticker glue effectively.
- Avoid sharp metal tools: Use plastic scrapers or credit cards to prevent scratches on your glass.
- Patience pays off: Letting the heat or solvent sit for a few minutes saves you from rework and frustration.
- Clean up residue properly: After removing the sticker, use Goo Gone or a citrus cleaner to eliminate any remaining adhesive.
- Protect your paint and clear coat: Always work gently and use barrier methods when removing car window stickers.
- Prevention is easier than removal: Applying a coat of car wax before putting on a sticker can make future removal much simpler.
📑 Table of Contents
- Why Stickers Are So Hard to Remove from Windows
- Method 1: Using Heat to Remove Stickers
- Method 2: Using Household Items to Dissolve Sticker Glue
- Method 3: Using Commercial Sticker Removal Products
- Method 4: Using a Plastic Scraper or Credit Card
- Removing Stickers from Tinted Windows
- Preventing Damage During Sticker Removal
- Quick Tips for Flawless Window Sticker Removal
- Comparison Table: Best Sticker Removal Methods
- Conclusion
Why Stickers Are So Hard to Remove from Windows
Before we jump into the how-to, it helps to understand what you’re dealing with. Stickers aren’t just paper. They’re a combination of paper or vinyl, ink, and a sticky adhesive layer that bonds to glass. Over time, that adhesive cures and hardens. Sun exposure, heat, and moisture all make it worse. That’s why a sticker that was easy to peel last month becomes a nightmare after summer.
The adhesive in most car window stickers is designed to be permanent. Manufacturers want promotional decals and safety labels to stay put through all kinds of weather. So when you try to rip them off, the glue stretches, breaks into tiny pieces, and clings to the glass. That’s where the real frustration begins. The sticker itself might come off, but the residue stays behind like a stubborn shadow.
Understanding this helps you approach removal the right way. You need to break down the adhesive bond slowly and safely. Rushing the process with sharp tools or harsh chemicals is the fastest route to scratches and damage. The methods below are designed to work with the glue, not against it.
Method 1: Using Heat to Remove Stickers
Why Heat Works So Well
Heat is the most natural and effective way to soften sticker adhesive. When you apply warmth, the glue becomes soft and pliable. This makes the sticker much easier to peel away in one clean piece. No scraping, no chemicals, and no residue left behind.
For this method, you’ll need a hair dryer or a heat gun. A hair dryer works perfectly for most car window stickers. If you’re dealing with a larger decal or one that’s been on for a very long time, a heat gun on low setting can be more effective. Just be careful not to overheat the glass, as extreme temperature changes can cause cracking in rare cases.
Step-by-Step Instructions
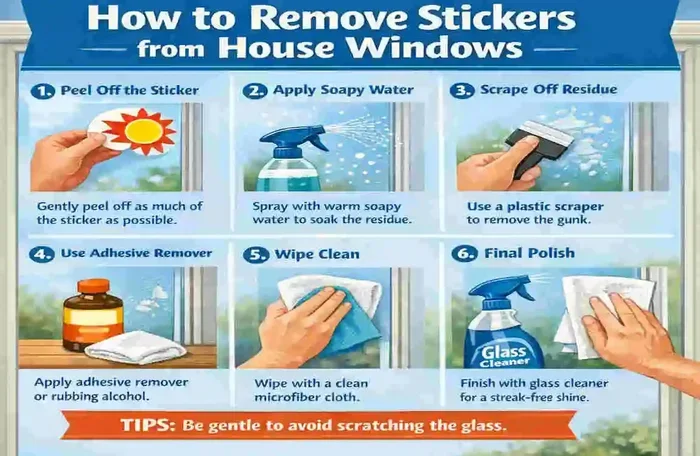
- Start with a clean surface. Wipe down the window with a microfiber cloth to remove any dirt or dust. This prevents scratches during the removal process.
- Apply heat evenly. Hold your hair dryer about 6 inches from the sticker. Move it back and forth slowly. Focus on the edges of the sticker first, where the adhesive is most exposed.
- Test the edge. After 30 to 60 seconds of heating, try lifting a corner with your fingernail or a plastic scraper. If it lifts easily, you’re ready to peel.
- Peel slowly at a 180-degree angle. Pull the sticker back over itself rather than away from the glass. This reduces tension on the adhesive and keeps it from snapping.
- Reapply heat as needed. If the sticker resists, apply more heat and continue peeling. Go slow and steady.
- Clean the window. Once the sticker is off, wipe the glass with a mixture of warm water and dish soap. This removes any remaining warmth and prepares the surface for the next step.
This method works beautifully for most paper and vinyl stickers. It’s the go-to technique for removing dealership decals and promotional window stickers. The best part? It costs nothing and takes just a few minutes.
Method 2: Using Household Items to Dissolve Sticker Glue
Vinegar Solution
White vinegar is a powerhouse for breaking down adhesive. The acetic acid in vinegar dissolves sticker glue without harming your glass or paint. It’s one of the safest and most affordable options you can use.
To use this method, soak a cloth or paper towel in white vinegar and place it directly over the sticker or the residue. Let it sit for 10 to 15 minutes. The vinegar will penetrate the adhesive and weaken its grip. After that, you should be able to wipe or peel the sticker away with ease. For stubborn residue, repeat the process or use a plastic scraper gently.
Rubbing Alcohol
Isopropyl alcohol is another excellent option for sticker removal. It dissolves adhesive quickly and evaporates cleanly, leaving no streaks on your glass. Apply a small amount to a microfiber cloth and rub the sticker residue in circular motions. The glue will soften and lift right off.
Be cautious with rubbing alcohol on tinted windows. Prolonged exposure can affect window tint adhesive over time. If your car has tinted rear windows, stick with vinegar or use alcohol sparingly and rinse immediately.
Cooking Oil or Baby Oil
Don’t overlook the kitchen. Cooking oil, baby oil, and even olive oil can dissolve sticker adhesive surprisingly well. Apply a small amount to a cloth and rub it into the residue. Let it sit for a few minutes, then wipe away. The oil breaks down the glue and leaves a thin protective film on the glass. Follow up with a glass cleaner to remove any oily residue.
WD-40
WD-40 is famous for loosening stuck parts, and it works wonders on sticker adhesive too. Spray a small amount directly onto the sticker or residue. Wait about 5 minutes. Then wipe it away with a clean cloth. WD-40 dissolves the adhesive bond completely and leaves the glass sparkling clean. Just make sure to wash the area with soap and water afterward, especially if it’s on a car window near the paint.
Method 3: Using Commercial Sticker Removal Products
If you want a product specifically designed for this job, several commercial options work extremely well. These products are formulated to dissolve adhesive without damaging glass, paint, or plastic.
Goo Gone is the most popular sticker removal product on the market. It’s a citrus-based solvent that breaks down adhesive safely. Apply it to the sticker or residue, let it sit for a few minutes, and wipe away. Goo Gone works on both fresh and old stickers and leaves behind a pleasant citrus scent. It’s safe for car windows, glass surfaces, and most painted areas when used as directed.
3M Adhesive Remover is another excellent choice. It’s designed for automotive applications and works well on cured adhesive. It’s a bit stronger than Goo Gone, so use it in a well-ventilated area and follow the instructions on the label.
Citrus-based cleaners in general are great for sticker removal. Look for products that list d-limonene as an active ingredient. This natural compound from citrus peel dissolves adhesive effectively and is much safer than harsh chemical solvents.
Method 4: Using a Plastic Scraper or Credit Card
Sometimes the sticker comes off easily, but the residue stays behind. In these cases, a plastic scraper or an old credit card can help you lift the remaining glue without scratching the glass.
Never use a razor blade or metal scraper on car windows. Even though glass is hard, the clear coat and paint around the edges are vulnerable. A single slip with a razor can leave a permanent scratch that’s impossible to remove without professional polishing.
Instead, use a plastic putty knife, a dedicated plastic scraper, or a worn-out credit card. Apply a small amount of vinegar, rubbing alcohol, or Goo Gone to soften the residue first. Then gently scrape at a low angle. The softened adhesive will lift off in small pieces. Work slowly and wipe your tool frequently to avoid redepositing glue onto the glass.
Removing Stickers from Tinted Windows
Special Considerations for Tinted Glass
Tinted windows require extra care during sticker removal. The tint film is applied to the interior surface of the glass using its own adhesive layer. Using harsh chemicals or excessive heat can damage this tint or cause it to peel away from the glass.
When removing stickers from tinted windows, avoid high heat. Keep your hair dryer on a low or medium setting and hold it further away from the glass. Never let the temperature get so hot that you feel discomfort through the glass.
Stick with gentle solvents like vinegar or a small amount of rubbing alcohol. Apply them with a soft cloth rather than spraying directly onto the glass. This prevents the solution from seeping under the tint edges and weakening the adhesive bond.
Best Products for Tinted Windows
- White vinegar and water solution: The safest option for all tint types.
- Goo Gone: Safe for tinted windows when used in moderation.
- Soapy water with a microfiber cloth: Great for light residue without any chemical risk.
- Citrus-based cleaners: Effective and gentle on tint adhesive.
Preventing Damage During Sticker Removal
Common Mistakes to Avoid
Even with the right method, mistakes can happen. Here are the most common errors people make when removing stickers from windows:
- Using a razor blade or metal tool. This is the number one cause of scratches. Always reach for a plastic alternative first.
- Applying too much heat. Excessive heat can crack glass or damage window tint. Keep the temperature moderate and move the heat source constantly.
- Peeling the sticker too quickly. Rushing the process tears the sticker and leaves behind large amounts of adhesive. Slow and steady wins this race.
- Using harsh chemical solvents on paint. Some adhesive removers can damage car paint or clear coat. Always test on a hidden spot first.
- Skipping the residue cleanup. Leaving adhesive residue on the window attracts dirt and looks terrible. Always follow up with a glass cleaner after removal.
Protecting Your Car’s Paint and Clear Coat
When removing stickers from car windows, the area right around the sticker is at risk. The adhesive can bond with the paint or clear coat, and pulling it off can strip away the protective layer. To prevent this, apply a small amount of petroleum jelly or a barrier cream around the edges of the sticker before you start heating it. This creates a protective layer between the adhesive and your paint.
After removing the sticker, inspect the surrounding area. If you notice any sticky residue on the paint, use a dedicated paint-safe adhesive remover. Apply it gently with a microfiber cloth and wipe away. Never scrub aggressively, as this can swirl the paint and dull the finish.
Quick Tips for Flawless Window Sticker Removal
- Work in the shade. Direct sunlight heats the glass unevenly and can cause the adhesive to re-bond quickly. Find a shaded spot or work indoors in a garage.
- Warm the entire sticker, not just the edges. Even heat distribution makes the whole sticker pliable and easier to peel in one piece.
- Use a ziplock bag as a barrier. If you’re worried about heat damage, place a thin plastic bag between the heat source and the sticker. This diffuses the heat and adds a layer of protection.
- Freeze the sticker as an alternative. On hot days, you can try freezing the sticker with a can of compressed air. The cold makes the adhesive brittle and easier to crack and remove.
- Follow up with a glass cleaner. After all the sticker and residue are gone, clean the window with a quality glass cleaner and a microfiber cloth. This removes any final traces and leaves the glass streak-free.
- Wax the area afterward. Applying a thin layer of car wax to the removal area restores protection to the clear coat and makes future sticker removal even easier.
Comparison Table: Best Sticker Removal Methods
| Method | Best For | Difficulty | Cost | Safe for Tinted Windows |
|---|---|---|---|---|
| Heat (Hair Dryer) | Fresh and medium-age stickers | Easy | Free | Yes, on low heat |
| Vinegar Solution | Residue and light adhesive | Easy | Very Low | Yes |
| Rubbing Alcohol | Stubborn residue | Medium | Low | Use with caution |
| Goo Gone | All types of adhesive | Easy | Moderate | Yes |
| Plastic Scraper | Residue removal | Medium | Very Low | Yes |
| WD-40 | Cured, old stickers | Medium | Low | Yes, rinse after |
| Cooking Oil | Light residue | Easy | Very Low | Yes |
Conclusion
Getting stickers off windows doesn’t have to be stressful or damaging. With the right approach, you can remove any sticker and leave your glass looking clean and clear. Heat, household solvents, and commercial products all offer effective solutions. The key is to be patient, use the right tools, and never rush the process.
Start with heat whenever possible. It’s the simplest and safest method for most stickers. If residue remains, turn to vinegar, rubbing alcohol, or Goo Gone. Use a plastic scraper for any stubborn leftover glue. And always finish with a good glass cleaner to make your windows sparkle.
Remember to protect your car’s paint and tinted windows by working gently and testing products in hidden spots first. With these techniques in your toolkit, you’ll never have to live with an ugly sticker or stubborn adhesive again. Your windows deserve to look their best, and now you have everything you need to make that happen.
Try these methods on your next sticker removal project and enjoy the satisfaction of seeing clean, damage-free windows. Once you see how easy it can be, you’ll wonder why you didn’t try it sooner.
Frequently Asked Questions
Can I use a razor blade to remove stickers from car windows?
It’s best to avoid razor blades on car windows. Even a small slip can scratch the glass or damage the paint around the edges. Instead, use a plastic scraper or an old credit card. These tools lift adhesive safely without the risk of permanent scratches.
How do I remove old stickers that have been on the window for years?
Old stickers need more time and patience. Start by applying heat with a hair dryer for 2 to 3 minutes. Then apply a citrus-based adhesive remover like Goo Gone and let it sit for 10 minutes. The combination of heat and solvent will break down even the oldest, cured adhesive. You may need to repeat the process for full removal.
Will vinegar damage car window tint?
White vinegar is generally safe for tinted windows when used properly. Apply it with a soft cloth rather than spraying directly. Avoid letting it sit for too long, and rinse the area with clean water afterward. If you have high-quality or recently applied tint, test vinegar on a small hidden area first.
What’s the easiest way to remove a bumper sticker from a car window?
The easiest method is to use a hair dryer on the highest heat setting. Hold it close to the sticker edges for 1 to 2 minutes until the adhesive softens. Then peel the sticker slowly at a 180-degree angle. If residue remains, apply a small amount of rubbing alcohol or Goo Gone and wipe it away with a microfiber cloth.
Can I use WD-40 on car windows to remove sticker residue?
Yes, WD-40 works well for dissolving sticker residue on car windows. Spray a small amount onto the residue, wait 5 minutes, and wipe it away with a clean cloth. Since WD-40 can leave an oily film, follow up with a glass cleaner and a microfiber cloth to restore clarity. Avoid getting WD-40 directly on painted surfaces for extended periods.
How can I prevent stickers from leaving residue on my windows in the future?
The best prevention method is to apply a thin layer of car wax to the window before placing the sticker. The wax creates a barrier that prevents the adhesive from bonding directly with the glass. When it’s time to remove the sticker, it will come off much more cleanly with less residue. You can also use a static cling sticker instead of an adhesive one, which leaves no glue behind at all.