How Do I Get a Smooth Finish With Touch-Up Paint Tips
Getting a smooth finish with touch-up paint is easier than you think. Whether you have a small chip or a deeper scratch, the right preparation and technique make all the difference. This guide walks you through every step—from cleaning and priming to wet sanding and blending—so you can achieve a flawless, factory-like repair at home.
Have you ever noticed a small chip or scratch on your car and thought, “That’s no big deal”? But over time, that tiny flaw can turn into a rust spot and make your whole vehicle look dull. Getting a smooth finish with touch-up paint is easier than you think, and it doesn’t require a professional body shop. With the right tools and a little patience, you can make those blemishes disappear in no time. In this guide, we’ll walk you through every step to achieve a flawless smooth finish with touch-up paint that looks factory-made.
Whether you’re dealing with a minor abrasion from a shopping cart or a deeper scratch from a rock, touch-up paint can save you hundreds of dollars. The key is knowing how to prep the surface, apply the paint evenly, and blend the edges. We’ll cover everything from basic spray can technique to advanced paint blending methods. By the end, you’ll have the confidence to tackle any paint repair on your own.
So, grab your touch-up pen or paint bottle, and let’s dive into the world of automotive paint repair. You’ll learn how to avoid swirl marks, prevent rust prevention issues, and create a durable gloss finish. Let’s get started!
Key Takeaways
- Choose the Right Product: Use a touch-up pen for tiny chips and a spray can for larger areas to ensure proper coverage.
- Prepare the Surface Thoroughly: Clean, sand, and prime the area to help the paint adhere and prevent rust.
- Apply Thin, Even Layers: Build up the paint gradually to avoid runs and achieve a smooth finish with touch-up paint.
- Wet Sand and Blend the Edges: Use fine-grit sandpaper and feather the clear coat for an invisible repair.
- Never Skip the Clear Coat: The clear coat protects the color and provides the glossy, factory-like finish.
- Know When to Call a Pro: Deep scratches or large panel damage often require professional automotive paint repair.
📑 Table of Contents
Understanding Touch-Up Paint and Its Challenges
Before you grab a can of paint, it helps to understand what you’re working with. Touch-up paint is not the same as a full paint job. It’s a small amount of color-matched paint designed to fill in chips and scratches. The goal is to restore the factory finish without drawing attention to the repair.
What Is Touch-Up Paint?
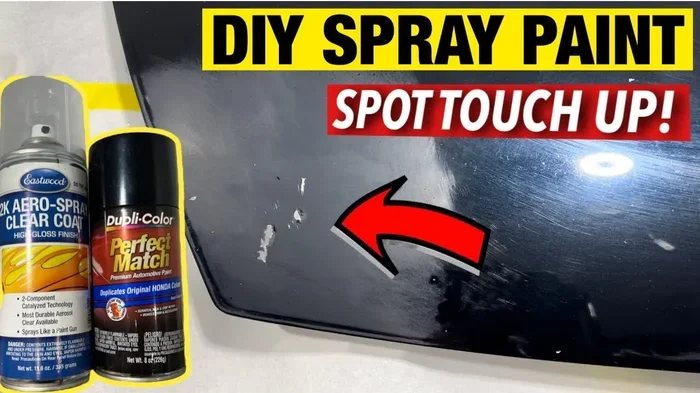
Touch-up paint comes in several forms. You have touch-up pens, small bottles with a brush tip, and aerosol spray cans. Pens are great for tiny chips. Spray cans work better for larger areas. Some kits even include a primer for bare metal. Choosing the right type depends on the size of the damage and your skill level.
Why Does Touch-Up Paint Look Rough?
Many people end up with a bumpy, uneven surface. This happens because they apply too much paint at once. The paint dries with a raised edge. Without proper paint leveling and sanding, the repair stands out. Another common issue is skipping the clear coat. The clear coat gives depth and protection. Without it, the color looks dull and flat.
The Role of Clear Coat
The clear coat is the final layer on your car. It’s clear, but it provides the gloss and UV protection. When you do a touch-up, you must apply a clear coat application after the color paint cures. This step is non-negotiable for a professional-looking result. It also helps with rust prevention by sealing the repair from moisture.
How Factory Paint Differs from Touch-Up Paint
Factory paint is applied in a controlled environment with multiple layers of primer, base coat, and clear coat. It’s cured under heat and pressure. Touch-up paint is applied at room temperature and air-dried. This difference means your repair will never be 100% identical, but with the right technique, it can be incredibly close. Understanding this helps set realistic expectations and reduces frustration.
Preparing the Surface for a Flawless Repair
Surface preparation is the most important step. If you skip this, even the best touch-up paint will look bad. Clean, dry, and properly sanded surfaces help the paint adhere and cure evenly.
Cleaning the Area
Start by washing the damaged area with soap and water. Use a microfiber cloth to remove dirt, wax, and oils. For stubborn grime, a little isopropyl alcohol on a cloth works wonders. You need a perfectly clean surface for color matching to look seamless. Never apply paint to a dirty or greasy surface.
Removing Rust and Loose Paint
If the chip has exposed metal, you must address rust prevention immediately. Use a small razor blade or sandpaper to gently scrape away any loose paint or rust flakes. Be careful not to spread the damage. A paint thickness gauge can help you check if the metal is still solid beneath the surface. If the gauge shows very thin paint, you may need a more extensive repair.
Sanding for Better Adhesion
Lightly sand the area around the chip with 600-grit wet/dry sandpaper. This creates a rough surface for the paint to grip. Don’t sand too deep. The goal is just to scuff the existing paint. After sanding, wipe the area with a damp cloth and let it dry completely. This step is crucial for paint leveling later.
Using a Paint Thickness Gauge to Assess Damage
A paint thickness gauge is a small electronic tool that measures the distance from the sensor to the paint surface. By taking readings at different spots, you can map out the paint layers. This tells you if the clear coat is intact or if it’s been worn away. For touch-up work, knowing the thickness helps you avoid sanding through the base color. It’s an inexpensive tool that pays for itself in prevented mistakes.
Quick Tips for Surface Preparation:
- Always work in a shaded, dust-free area.
- Use a clean, lint-free cloth for wiping.
- Let the surface dry fully before painting.
- Keep a paint thickness gauge handy to monitor your progress.
- Wipe the area with isopropyl alcohol right before painting.
Achieving a Smooth Finish with Touch-Up Paint
Now comes the fun part—applying the paint. But technique matters more than the product you buy. A smooth finish with touch-up paint comes from patience and the right method.
Wet Sanding for Leveling
After the paint dries (usually 24 hours), you may notice a slight ridge. Wet sanding smooths this out. Use 1500-grit or 2000-grit sandpaper with water. Sand in a circular motion until the surface is flush with the surrounding paint. This is a key part of paint correction and paint leveling. Quick Tip: Keep the sandpaper wet at all times to avoid clogging and scratching.
Using a Paint Sprayer for Even Coverage
For larger repairs, a paint sprayer gives the most even coat. Aerosol cans work for small areas, but a gravity-fed sprayer offers better control. Hold the can 6–8 inches away. Use light, overlapping passes. Build up the color in thin layers rather than one thick coat. This prevents runs and drips, which ruin the gloss finish. Expert Insight: Practice your spray pattern on a piece of cardboard first to get a feel for the coverage.
Blending the Edges
To make the repair invisible, you need to blend the paint into the surrounding area. Use a small brush or a sponge applicator to feather the edges. Apply a thin layer of clear coat over the repair and extend it slightly onto the old paint. This creates a seamless transition. Quick Tip: Blend out at least half an inch beyond the visible damage for the best results.
Letting the Paint Cure Properly
Paint curing is the process where the solvents evaporate and the paint hardens. Rushing this step leads to a soft, easily damaged finish. Most touch-up paint needs 24 to 48 hours to cure fully. During this time, keep the car out of direct sunlight and away from moisture. A garage or covered area is ideal. Proper curing is essential for a durable clear coat application and long-lasting rust prevention.
Avoiding Common Application Errors
Even experienced DIYers make mistakes. One of the biggest is shaking the can too hard, which creates bubbles in the paint. Instead, roll the can gently between your hands. Another error is spraying too close, which causes drips. Keep a consistent distance and move your arm smoothly. If you see a run forming, don’t wipe it immediately. Let it dry completely, then wet sand it smooth. Patience is your best friend in automotive paint repair.
| Method | Best For | Pros | Cons |
|---|---|---|---|
| Touch-Up Pen | Small chips, pinpoint scratches | Easy to use, precise, cheap | Limited coverage, hard to blend |
| Aerosol Spray Can | Medium chips, scuffs | Even coverage, fast drying | Over-spray risk, needs ventilation |
| Paint Sprayer (Electric) | Large areas, panel repairs | Professional finish, full control | Expensive, learning curve |
Quick Tips for a Flawless Touch-Up:
- Apply paint in thin, even layers.
- Never shake the can too aggressively; roll it gently.
- Use a touch-up pen for chips smaller than a dime.
- Always finish with a clear coat application.
- Work in a temperature between 60°F and 80°F.
Advanced Tips for Blending and Color Matching
Getting the right color is only half the battle. Blending ensures the repair disappears into the original paint. These advanced techniques will elevate your work.
How to Match Your Car’s Paint Code
Every vehicle has a paint code, usually found on a sticker in the driver’s door jamb. Use this code to order the exact color matching formula. Some touch-up kits come with a color guide, but a code-matched paint is always more accurate. If you can’t find the code, visit a dealership or auto parts store with your VIN. A perfect color matching system saves you from a mismatched repair.
Why Paint Blending Matters
Paint blending is the technique of gradually transitioning the new paint into the old paint. Without blending, you get a visible line or edge. This is especially important on curved surfaces like fenders and doors. The key is to extend the repair area slightly beyond the visible damage. A smooth finish with touch-up paint depends on this seamless transition.
Using a Paint Thickness Gauge
A paint thickness gauge measures the layers of paint on your car. It helps you determine how much clear coat and base coat remain. This is especially useful when working on older vehicles with uneven paint. Knowing the thickness prevents you from sanding through to the primer and causing more damage.
Avoiding Swirl Marks
Swirl marks are tiny scratches that dull the paint. They happen when you wipe dust off a wet surface or use a dirty cloth. Always use a clean, microfiber towel. When buffing, use a polishing pad and a quality buffing compound. Work in small circles with light pressure to maintain a flawless gloss finish. Expert Insight: A dual-action polisher is the best tool for removing swirl marks without damaging the paint.
Expert Insights: The Art of Paint Blending
Professional detailers use a technique called “cut and fill.” They apply the paint slightly raised, then level it with wet sanding and polishing. This creates a perfect blend that’s invisible to the naked eye. For DIYers, the simplest way to achieve this is to apply the clear coat a little wider than the color coat, then level everything together. The result is a gloss finish that matches the surrounding paint.
How to Fix a Bad Touch-Up
If your repair looks rough or mismatched, don’t panic. You can often fix it. Let the paint cure completely, then wet sand the area with 2000-grit paper. Apply a thin layer of primer, then reapply the color and clear coat. This second chance often produces a much better result. Quick Tip: Keep a small container of your touch-up paint for future fixes.
Common Mistakes That Ruin Your Finish
Even with the best touch-up paint, mistakes can happen. Here are the most common errors and how to avoid them.
Skipping the Primer
If the damage reaches bare metal, you must use a primer. Primer protects against corrosion and helps the color paint stick. Skipping it leads to rust under the clear coat, which will eventually bubble and peel. Always apply a thin, even coat of primer and let it dry fully before painting.
Applying Too Much Paint at Once
Thick coats trap solvent and take forever to cure. They also sag and form runs. Build up the paint in multiple thin layers. Let each layer dry for 10–15 minutes. This ensures a smooth, even paint leveling surface. Remember, touch-up paint is all about thin, controlled applications.
Ignoring the Clear Coat
The clear coat is what makes your paint shine. Without it, the repair looks matte and exposed to the elements. Always apply at least two thin coats of clear coat after the color paint has cured. This provides the necessary protection and that deep, wet look.
Using the Wrong Sandpaper Grit
Starting with too coarse a sandpaper (like 400-grit) can cut through the clear coat and leave deep scratches. Always start with 600-grit for prep and finish with 2000-grit for smoothing. This preserves the surrounding paint and ensures a seamless blend.
Top 5 Mistakes to Avoid:
- Skipping surface cleaning.
- Applying paint in thick coats.
- Forgetting the clear coat.
- Using dirty cloths that cause swirl marks.
- Rushing the paint curing process.
When to Call a Professional
DIY touch-up is great for small chips and scratches. But some damage needs a professional’s touch. Knowing when to stop and call an expert can save you time and money.
Deep Scratches and Metal Exposure
If the scratch is deep enough to see bare metal or the primer, a simple touch-up pen won’t cut it. Deep scratches require paint correction techniques like sanding, filling, and multiple layers of primer and paint. A professional has the tools and expertise to match the factory finish perfectly.
Large Panel Repairs
Repairing a whole door panel or hood is a big job. Automotive paint repair on large areas requires a paint sprayer, a paint booth, and proper paint curing equipment. Attempting this yourself can lead to orange peel texture and uneven color. Leave large panel work to the pros.
When the Paint Code Is Unknown
Sometimes the paint code is faded or missing. A professional body shop has access to manufacturer databases and can mix the exact color. For a perfect color matching result, this is often the best route.
Conclusion
Achieving a smooth finish with touch-up paint is a satisfying skill that anyone can learn. By following the steps above—preparing the surface, applying thin coats, wet sanding, and blending—you can make your car look like new again. Remember to use touch-up paint correctly, never skip the clear coat, and take your time. With practice, your automotive paint repair skills will improve, and you’ll save money on costly body shop visits. Now grab your supplies and give your car the fresh start it deserves.
Frequently Asked Questions
Can I use touch-up paint in the rain?
No. Always apply touch-up paint in dry conditions. Moisture can cause the paint to bubble and ruin the adhesion. Wait for a clear, dry day and ensure the surface is completely dry before you start.
How long should I wait before wet sanding?
Let the paint cure for at least 24 hours. For best results, wait 48 hours. This allows the solvent to fully evaporate and the paint to harden, making wet sanding safer and more effective.
What if the color doesn’t match perfectly?
Color matching can be tricky due to sun fading. If the match is slightly off, you can blend the edges out further. Using a paint sprayer helps create a gradual transition that’s less noticeable.
Do I need a paint thickness gauge?
Not strictly necessary, but it’s very helpful. It prevents you from sanding through the clear coat and into the base color. A gauge gives you confidence when working on older vehicles with thin paint.
Can I apply clear coat over touch-up paint the same day?
It’s best to wait until the color paint is fully dry, usually 24 hours. Applying clear coat too soon can trap solvents and cause hazing. Patience leads to a better gloss finish.
How do I prevent swirl marks after touch-up?
Always use a clean microfiber towel and avoid wiping the wet paint. When you need to buff, use a polishing pad and a small amount of buffing compound. Work gently in straight lines, not circles.