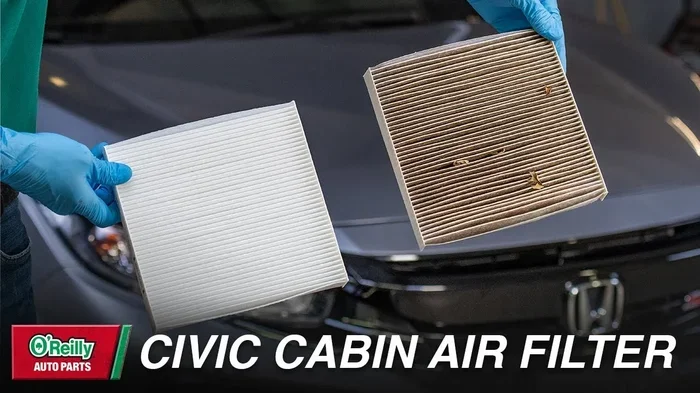
How to Change the Cabin Air Filter in a Honda Civic
Changing the cabin air filter in your Honda Civic is one of the easiest maintenance tasks you can do at home. This guide walks you through every step, from finding the filter to picking the right replacement. You will learn how often to change it, what tools you need, and how to avoid common mistakes that could damage your Honda Civic HVAC system.
Your Honda Civic is more than just a car. It is a daily companion that takes you to work, runs errands, and gets you where you need to go. But there is one part of your vehicle that quietly affects your health and comfort every single time you turn the key: the cabin air filter. This small but mighty component works behind the scenes to keep the air inside your car clean and fresh. Yet most drivers overlook it until they notice a musty smell or weak airflow from the vents.
If you have been wondering how to change the cabin air filter in a Honda Civic, you are in the right place. This guide breaks down the entire process into simple, easy-to-follow steps. Whether you are a complete beginner or a seasoned DIYer, you will find everything you need right here. No special skills required. No expensive tools needed. Just a little time and the right replacement part.
Keeping up with car maintenance does not have to be intimidating. In fact, some of the most important tasks are the simplest ones. Changing your cabin air filter is a perfect example. It takes less than fifteen minutes, costs very little, and makes a noticeable difference in how your car feels inside. Let us get into it.
Key Takeaways
- Easy DIY Job: You can change the cabin air filter in under 15 minutes with basic tools.
- Saves Money: Doing it yourself costs a fraction of what a mechanic would charge.
- Better Air Quality: A clean filter removes pollen, dust, and debris from your car’s interior.
- Improved AC Performance: A clogged filter restricts airflow and makes your AC work harder.
- Know When to Replace: Most Honda Civics need a new cabin filter every 15,000 to 30,000 miles.
- Right Filter Matters: Using the correct OEM or compatible filter ensures proper fit and function.
📑 Table of Contents
- What Is a Cabin Air Filter and Why It Matters
- Tools and Materials You Will Need
- Step-by-Step Guide to Changing the Cabin Air Filter
- Common Mistakes to Avoid
- How Often Should You Replace Your Cabin Air Filter
- Cabin Air Filter vs Engine Air Filter
- The Benefits of Regular Cabin Air Filter Changes
- Conclusion
What Is a Cabin Air Filter and Why It Matters
The cabin air filter is a small filtration device located inside your Honda Civic’s HVAC system. It sits between the outside air intake and the interior of your car. Its job is simple but critical: trap dust, pollen, dirt, and other airborne particles before they enter the cabin through the vents.
How the Cabin Air Filter Works
When you turn on the fan or air conditioning, air gets pulled into the system through the cabin air filter. The filter captures pollutants like pollen, mold spores, exhaust particles, and even tiny bits of debris. Clean air then flows through the vents and into the cabin. This process keeps the air you breathe while driving much healthier and more pleasant.
Think of the cabin filter like a net that catches everything unwanted. Over time, that net fills up. When it does, it can no longer do its job effectively. That is when problems start to appear.
Signs Your Cabin Air Filter Needs Replacement
Your car will tell you when something is wrong. You just need to know what to look for. Here are the most common signs that your cabin air filter is due for a change:
- Weak airflow from the vents: If the air coming out feels weak or barely noticeable, a clogged filter is likely the culprit.
- Unpleasant odors: A musty or moldy smell when the AC or heater is running often means trapped moisture and debris in the filter.
- Increased allergy symptoms: Sneezing, itchy eyes, or congestion inside the car can point to a dirty filter that is not blocking pollen and dust properly.
- Visible debris around the vents: Sometimes you can see dust or dirt accumulating near the dashboard vents.
- Reduced AC or heating performance: A blocked filter makes the entire HVAC system work harder, reducing heating and cooling efficiency.
If you notice any of these symptoms, it is time to inspect your Honda Civic cabin filter. Catching the problem early prevents further issues with your HVAC system and keeps your car’s interior air quality high.
Tools and Materials You Will Need
One of the best things about this job is how simple the requirements are. You do not need a garage or fancy equipment. Here is what you will need:
- Replacement cabin air filter: Make sure you get the correct size and type for your specific Honda Civic model year. Check your owner’s manual or look up the part number online.
- Flathead screwdriver or trim removal tool: You will need this to gently remove any plastic clips or covers.
- Flashlight: The filter compartment can be dark and tight. A flashlight helps you see what you are doing.
- Soft cloth or vacuum: Useful for cleaning out any debris from the filter housing before inserting the new filter.
- Disposable gloves (optional): The old filter can be dirty, so gloves keep your hands clean.
Most replacement cabin air filters cost between fifteen and thirty dollars. You can find them at auto parts stores, online retailers, or even some gas stations. If you are unsure about which filter to buy, the team at your local Honda dealership can also help you find the correct part for your specific model year.
Step-by-Step Guide to Changing the Cabin Air Filter
Now for the part you have been waiting for. Here is the full walkthrough for replacing the cabin air filter in your Honda Civic. Follow each step carefully and you will be done in no time.
Step 1: Locate the Cabin Air Filter Compartment
In most Honda Civic models, the cabin air filter is located on the passenger side of the vehicle, behind the glove box. Open the glove box and push it in fully until it stops. You will notice two small tabs on the sides. Squeeze them inward and the glove box will drop down, giving you access to the filter compartment.
Some newer Civic models may have a different access point. Always refer to your owner’s manual for the exact location. If you are unsure, a quick search online for your specific model year and trim level will give you clear guidance.
Step 2: Remove the Old Filter
Once you have access to the compartment, you will see the filter housed in a plastic cover or bracket. The cover is usually held in place by a few clips or a screw. Gently release the clips or remove the screw and pull the cover off.
Carefully slide the old cabin filter out. Pay attention to which direction the airflow arrow is pointing on the filter frame. This arrow shows which way the air should flow through the filter. You will need to install the new filter in the same orientation.
Take a moment to look at the old filter. If it is covered in leaves, dust, or other debris, you will immediately understand why the filter needed replacing. Use a soft cloth or a small vacuum to clean any loose dirt from the filter housing before moving on.
Step 3: Install the New Filter
Take your new Honda Civic cabin air filter out of the packaging. Check that it matches the old filter in size and shape. If it looks different, double-check the part number before proceeding.
Insert the new filter into the housing with the airflow arrow pointing in the correct direction. Usually, the arrow points toward the engine or downward, depending on your model. Slide it in firmly until it sits snugly in place.
Replace the cover or bracket and snap the clips back into position. Push the glove box back up and let it click into place. That is it. You have just completed one of the easiest and most rewarding DIY car repair tasks there is.
Quick Tips for a Smooth Installation
- Take a photo before removing the old filter: This helps you remember the correct orientation and placement.
- Do not force the filter in: If it does not fit easily, check that you have the right part and that it is oriented correctly.
- Dispose of the old filter properly: The old filter contains trapped dirt and allergens. Seal it in a bag before throwing it away.
- Check the filter housing for damage: Look for cracks or broken clips. A damaged housing can let unfiltered air bypass the filter.
Common Mistakes to Avoid
Even simple tasks can go wrong if you are not careful. Here are the most common mistakes people make when changing their cabin air filter:
- Installing the filter backwards: This restricts airflow and reduces the filter’s effectiveness. Always match the airflow arrow direction.
- Using the wrong filter size: A filter that is too small will not seal properly, and a filter that is too big may not fit. Always verify compatibility with your Honda Civic model year.
- Forgetting to clean the housing: Debris left in the compartment can contaminate the new filter and reduce its lifespan.
- Ignoring the filter entirely: Some drivers go years without changing the cabin filter. This leads to poor air quality, stronger odors, and potential strain on the HVAC blower motor.
- Using a generic filter without checking quality: Not all aftermarket filters are created equal. Look for filters with a high MERV rating for better particle capture.
Avoiding these mistakes ensures your cabin air filter replacement goes smoothly and delivers the best results. If you ever feel unsure, remember that Jiffy Lube and many quick-lube shops also offer air filter services if you prefer professional help.
How Often Should You Replace Your Cabin Air Filter
The general recommendation for most Honda Civic models is to replace the cabin air filter every 15,000 to 30,000 miles. However, your driving conditions play a big role in how quickly the filter gets dirty.
If you frequently drive on dusty roads, in heavy traffic, or in areas with a lot of pollen, you may need to replace the filter more often. Similarly, if you live in a humid climate, moisture can cause the filter to collect mold and debris faster.
Here is a simple guide to help you decide:
- Normal driving conditions: Replace every 20,000 to 30,000 miles.
- Dusty or rural roads: Replace every 10,000 to 15,000 miles.
- High pollen or urban areas: Replace every 15,000 miles or at the start of allergy season.
- You notice symptoms: Replace immediately, regardless of mileage.
Regular filter replacement keeps your Honda Civic running at its best. It also protects the HVAC system from unnecessary wear. Think of it as a small investment that pays off in cleaner air and better performance.
Cabin Air Filter vs Engine Air Filter
It is easy to confuse the two, but they serve very different purposes. The engine air filter cleans the air that goes into the engine for combustion. The cabin air filter cleans the air that enters the passenger compartment. Both are important, but they are not interchangeable.
Some drivers assume that if they change one, the other is covered. That is not the case. The cabin air filter specifically targets particles that affect your breathing and comfort inside the car. If you are unsure whether your engine air filter also needs attention, you can always check during your next oil change or visit a service center.
Keeping both filters in good condition is part of a solid Honda maintenance routine. Together, they ensure your engine runs efficiently and the air inside your car stays clean and healthy.
The Benefits of Regular Cabin Air Filter Changes
Beyond just fresh-smelling air, there are several real benefits to staying on top of your cabin air filter replacement schedule:
- Healthier cabin environment: A clean filter blocks pollen, mold spores, and fine particulate matter that can trigger allergies and respiratory issues.
- Better AC and heater performance: Unrestricted airflow means your climate control system works efficiently and responds faster.
- Longer HVAC component life: When the blower motor does not have to work overtime, it lasts longer and needs fewer repairs.
- Odor control: A fresh filter helps eliminate stale smells from food, pets, or outside pollution that enter the car.
- Resale value: Simple maintenance like this shows potential buyers that the car has been well cared for.
These benefits add up over time. A few minutes of work every year or so can save you from costly repairs and keep your daily driving experience much more enjoyable.
Conclusion
Changing the cabin air filter in a Honda Civic is one of the simplest and most impactful maintenance tasks you can do. It takes just a few minutes, costs very little, and immediately improves the air quality inside your car. From stronger airflow to better AC performance, the benefits are real and noticeable.
Do not wait for strange smells or weak vents to remind you. Make cabin air filter replacement part of your regular car maintenance schedule. Your lungs, your HVAC system, and your daily driving comfort will all thank you. Grab a new filter, follow the steps in this guide, and enjoy the difference clean air makes.
Remember, if you ever feel uncertain about any part of the process, you can always reach out to a trusted Honda dealership or service center. Staying proactive with your Honda Civic care is the best way to keep it running smoothly for years to come.
Frequently Asked Questions
Where is the cabin air filter located in a Honda Civic?
In most Honda Civic models, the cabin air filter is located behind the glove box on the passenger side. You access it by pushing the glove box in fully, squeezing the side tabs, and letting it drop down. Once you can see the filter compartment, you are in the right spot.
How much does a cabin air filter for a Honda Civic cost?
A replacement cabin air filter typically costs between fifteen and thirty dollars. OEM filters from a Honda dealership may be slightly more expensive, but aftermarket options from auto parts stores work just as well for most drivers.
Can I drive my Honda Civic without a cabin air filter?
Technically yes, but you should not. Driving without a cabin filter allows dust, pollen, and debris to enter the cabin freely. Over time, this can reduce air quality, strain the HVAC blower motor, and cause unpleasant odors inside the car.
How long does the cabin air filter replacement take?
Most drivers can complete the job in under fifteen minutes. Once you have the replacement filter and the right tools, the process is quick and straightforward. It is one of the fastest DIY car maintenance tasks you can do.
What happens if I install the cabin air filter backwards?
Installing the filter in the wrong direction restricts airflow and reduces filtration efficiency. The airflow arrow on the filter frame should point in the same direction as the air flows through the system. If you are unsure, take a photo before removing the old filter for reference.
How do I know which cabin air filter fits my Honda Civic?
Check your owner’s manual for the correct part number and specifications. You can also look up your model year and trim level online to find compatible filters. Make sure the replacement filter matches the original in size, shape, and airflow direction.