Can I Replace My Windshield Wipers Myself Right Now
Can I Replace My Windshield Wipers Myself? Absolutely, and it takes less than 10 minutes. This guide shows you how to pick the right wiper blades, use basic tools, and install them safely. You’ll save money, boost visibility, and keep your car in top shape with these simple steps.
Have you ever wondered can I replace my windshield wipers myself? The answer is a resounding yes. Swapping out old wiper blades is one of the easiest DIY car maintenance tasks you can do. It takes just a few minutes and costs a fraction of what a shop would charge. You’ll boost your visibility on rainy days and keep your windshield cleaning routine effective. No mechanic is needed.
Many drivers fear car repairs. They think every job requires a garage and a bill. But wiper replacement is different. It’s a simple car care routine you can master at home. Whether it’s a dry winter streak or a noisy swipe, your wipers deserve attention. This guide walks you through every step. You’ll learn what tools you need, how to remove the old blades, and how to install new ones. By the end, you’ll feel confident tackling this wiper replacement project yourself.
Key Takeaways
- Yes, you can do it: Replacing your own wipers is simple, fast, and requires no special skills.
- Right tools matter: A socket wrench, towel, and the correct size blades are all you need.
- Check your owner’s manual: It lists the exact wiper size and connector type for your vehicle.
- Avoid common mistakes: Never lift the wiper arm on a dry windshield, and seat the new blade fully.
- Choose the right blade: Beam wipers offer better performance, but frame wipers are budget-friendly.
- Replace regularly: Change your blades every 6–12 months for clear, streak-free visibility.
📑 Table of Contents
Can I Replace My Windshield Wipers Myself? Yes, and It’s Easy.
The short answer is yes. You can absolutely replace windshield wipers on your own. Most vehicles use a simple snap-on or push-button connector. You don’t need advanced mechanical knowledge. A quick look at your owner’s manual tells you the blade size and connector type. Then a trip to the auto parts store or a quick online order gets you the right wiper blades. Within minutes, you’ll have fresh rubber gliding across your glass. The whole process is clean, safe, and surprisingly satisfying.
Think about how often you use your wipers. They clear rain, snow, and debris. Over time, the rubber hardens and cracks. A worn blade leaves streaks and shadows on your windshield. That reduces your visibility when you need it most. Replacing them yourself ensures you always have a clear view. It’s a small act that makes a big safety difference.
Why DIY Wiper Replacement Is a Smart Move
Choosing the DIY route for wiper replacement has clear benefits. First, you save money. A shop might charge $20–$50 for the job. The blades themselves cost $10–$25. You keep the difference. Second, you control the timing. You don’t wait for an appointment. When the streaks start, you fix them immediately. Third, you learn about your car. Understanding basic parts builds confidence for bigger car care tasks later.
Also, many people don’t realize how dirty the rubber gets. Pollen, road grime, and winter salt build up on the blade. A quick wipe with a damp cloth during windshield cleaning extends blade life. But eventually, the rubber wears out. That’s when you swap it out. Doing it yourself means you can do it as soon as you notice the problem. No more waiting for a sunny weekend to visit a garage.
Tools, Parts, and Your Owner’s Manual
Before you start, gather a few items. The process is quick once everything is ready. Here’s what you need:
- New wiper blades – Match the size from your owner’s manual or use the size chart at the store.
- Socket wrench or pliers – Some connectors need a small tool to release the old blade.
- A microfiber towel – To clean the windshield and protect the glass from scratches.
- Windshield washer fluid – Top up while you’re at it. Fresh fluid helps the new blades wipe clean.
- Your owner’s manual – It shows the exact connector type and blade length for your vehicle.
Check the wiper size carefully. Front and rear blades are often different lengths. Some cars have a single rear wiper, while others have a pair. Write down the sizes before you go shopping. A wrong size won’t fit properly, and you’ll end up back at the store.
Understanding Wiper Connectors
Wiper blades attach to the metal wiper arms using different connectors. Knowing yours prevents frustration at the checkout. The three main types are hook, bayonet, and push-button. Most modern cars use a push-button or hookless design. Older vehicles often have a traditional hook connector. Your owner’s manual will confirm the type. You can also look at the old blade to see how it clips on.
When you buy new blades, check if they include the adapter. Many aftermarket wiper blades come with multiple adapters. This makes them fit a wide range of cars. Premium brands like Bosch, Rain-X, Michelin, and Trico often include everything you need. You simply slide the adapter into the connector and click it in place.
| Connector Type | How It Works | Common Vehicles |
|---|---|---|
| Hook (Traditional) | A metal hook slides under the blade’s pin and locks into place. | Older sedans, trucks, and some economy cars. |
| Bayonet | The blade has a pin that pushes straight into the arm’s socket. | Many European models and newer sedans. |
| Push-Button (Hookless) | A plastic tab clicks onto a flat adapter on the wiper arm. | Most modern cars, SUVs, and crossovers. |
Step-by-Step: Swapping Out Your Wipers
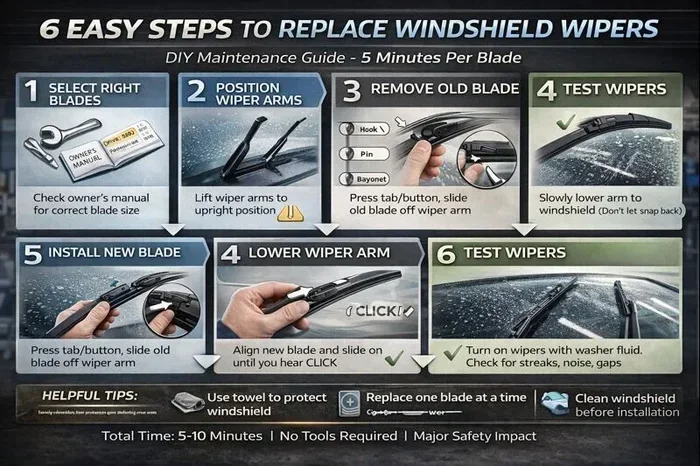
Now it’s time to get your hands dirty. Follow these steps for a smooth wiper replacement. Work on a cool, shaded surface. Never lift the wiper arm on a hot, dry windshield. The glass can crack from the sudden tension.
- Lift the wiper arm away from the windshield. Gently raise it until it stands upright. Place a folded towel between the arm and the glass. This prevents accidental contact and scratches.
- Locate the release mechanism. On a hook connector, find the small tab or button on the underside of the blade. Press it while sliding the blade off the arm. On a push-button connector, simply press the release tab and pull the blade straight off.
- Remove the old blade. Slide it out of the adapter. Set it aside. Note which side it came from (driver or passenger) and the angle of the connector. This helps you install the new one correctly.
- Unbox the new blade. Remove any plastic packaging or safety strips. If the new blade has a protective cover over the rubber, peel it off. Some blades come pre-installed with the adapter; others require you to attach the adapter first.
- Attach the new blade. Align the connector with the wiper arm’s pivot point. For a hook type, slide the pin into the slot and feel it click. For a push-button type, press the adapter firmly onto the arm until it locks. Give it a gentle tug to confirm it’s secure.
- Lower the arm back onto the windshield slowly. Repeat the process on the other side if needed.
- Test the wipers. Turn on the ignition and activate the wipers with washer fluid. Watch for streaks, chattering, or skipping. A properly installed blade should glide smoothly and silently.
Quick Tip: If the new blade feels stiff or doesn’t sit flat, double-check that the adapter is fully seated. Sometimes a plastic clip or metal pivot needs a little wiggling to release the old blade. Never force anything. A gentle push or pull solves most issues.
Common Mistakes That Can Damage Your Windshield
Even simple tasks have pitfalls. Avoid these common mistakes to keep your windshield and wiper arms in great shape:
- Lifting the arm on a dry windshield. The spring-loaded arm can snap forward and crack the glass. Always place a towel or cloth down first.
- Forcing the connector. If the blade doesn’t slide off easily, check for a hidden release tab. Forcing it can bend the metal arm or break the plastic adapter.
- Mixing up left and right blades. Some cars use different blade lengths for each side. Installing them backward causes poor contact and streaking.
- Forgetting to remove the safety strip. New blades often have a plastic or paper cover over the rubber. Leaving it on blocks contact with the glass.
- Touching the rubber squeegee. Oils from your fingers harden the rubber and shorten its life. Handle the blade by the plastic frame only.
How to Choose the Best Wiper Blades for Your Car
Not all wiper blades are created equal. Choosing the right type improves your visibility and lasts longer. Here’s what to consider:
Frame vs. Beam Wipers. Traditional frame wipers have a metal skeleton that presses the rubber against the glass. They’re affordable and widely available. Beam wipers, also called bracketless or hookless wiper designs, use a single piece of flexible plastic. They conform better to curved windshields and reduce streaking. Beam wipers are the top choice for most modern cars.
All-Season vs. Winter Wipers. All-season wipers handle rain and light snow. They’re a solid choice for mild climates. Winter wipers have a protective boot that prevents ice from clogging the joints. If you live in a snowy area, invest in winter blades. They make a huge difference during rainy season and freezing mornings. Remember to switch back to all-season blades in spring to avoid premature wear.
Silicone vs. Rubber. Most blades use natural rubber squeegees. They’re effective but wear faster. Silicone blades last longer and perform better in extreme heat and cold. They cost a bit more but often outlast traditional rubber by several months. For a windshield cleaning routine that lasts, silicone is worth considering.
OEM vs. Aftermarket. OEM wiper blades are made by the same company that supplied your car. They fit perfectly but carry a premium price. Aftermarket wiper blades from brands like Bosch, Rain-X, or Trico offer excellent quality at lower prices. Check reviews and size charts to find the best aftermarket wiper for your vehicle.
Expert Insights: What Mechanics Say About Wiper Replacement
Many mechanics agree that wiper replacement is one of the most overlooked car care tasks. “Drivers often wait until they can barely see through a downpour,” says a certified auto technician. “A simple DIY wiper replacement every six months can prevent dangerous visibility issues. It’s one of the easiest ways to maintain your vehicle’s safety systems.”
Experts also recommend checking the wiper arms for rust or weak springs. A weak arm won’t press the blade firmly against the glass. If you notice the arm bouncing or leaving gaps, replace the entire arm assembly. This is a slightly more involved DIY car maintenance task, but still doable with basic tools. Keeping the arms in good condition ensures your new blades perform at their best.
Key Takeaways
- DIY replacement is simple: You can swap wipers in under 10 minutes with basic tools.
- Know your connector: Hook, bayonet, or push-button – match the new blade to your arm type.
- Protect your windshield: Always use a towel when lifting the wiper arm.
- Choose the right blade: Beam wipers and silicone rubbers offer the best long-term performance.
- Replace on schedule: Every 6–12 months keeps your visibility clear and streak-free.
The entire process reinforces how easy DIY car maintenance can be. You don’t need a garage full of tools. A few minutes of attention keeps your windshield cleaning system working perfectly. Next time you see streaks on your glass, remember that can I replace my windshield wipers myself has a confident answer. You’ve got this.
Regular wiper replacement is a small habit with big rewards. It improves safety, saves money, and gives you a sense of accomplishment. Grab your new blades, follow the steps above, and enjoy a clear view every time you drive. Your windshield will thank you.
Frequently Asked Questions
Do I need any special tools to replace my windshield wipers?
No special tools are required. Most wiper replacement jobs need only a socket wrench or pliers for a tight connector. Your owner’s manual may mention a specific size, but a standard 10mm socket works on many vehicles. Beyond that, you just need the new wiper blades and a towel to protect your glass.
How often should I replace my windshield wipers?
Replace your blades every 6 to 12 months. Signs of wear include streaking, chattering, and visible cracks in the rubber. If you live in a sunny or harsh climate, the rubber degrades faster. A simple check every few months keeps your visibility sharp during rainy season and winter storms.
Can I use the same wiper blades on the driver and passenger side?
Sometimes, but not always. Many cars use different lengths for each side. Check your owner’s manual or the size chart on the old blade before purchasing. Installing the wrong size can leave gaps or cause the blade to hit the fender or hood. Always match the specific length for each position.
What’s the difference between a frame wiper and a beam wiper?
A frame wiper uses a metal skeleton to press the rubber against the glass. It’s budget-friendly and works well. A beam wiper (also called hookless) uses a single flexible plastic piece that conforms to the windshield curve. Beam wipers reduce streaking and look sleeker. For most modern cars, beam wipers offer better windshield cleaning performance.
Is it safe to lift the wiper arm on a hot, dry windshield?
No, it’s not safe. The spring-loaded arm can snap forward with great force and crack the glass. Always place a folded towel between the arm and the windshield before lifting. Work in a shaded area or let the car cool down first. This simple precaution prevents costly damage and keeps your car care routine safe.
Can I replace just the rubber insert instead of the whole blade?
Yes, many wiper blades allow you to replace only the rubber insert. This is a cost-effective option that reduces waste. You slide out the old rubber and click in a new refill. However, if the metal frame is bent or the connector is worn, a full blade replacement is better. New inserts work best when the frame is still in good condition.